How to obtain a swift and precise overview of all your ACL roles with aclEZ
During conversations with users about our server-wide ACL management solution, aclEZ, we learned that most really appreciate that the Ytria tool offers them a global view to oversee and manage everything about Access Control Lists (ACLs). However, further discussion led us to understand that some users were unaware of the practical ways it could help them manage roles in addition to flags. Since the management of roles is critical when it comes to dealing with ACLs, we would like to explain it here in detail.
The challenge
Managing roles in aclEZ has been quite the challenge considering that each database can have 5 to 10+ unique roles. Displaying these roles as individual columns in a grid where all ACL entries are loaded from an entire server would make the grid very difficult to read and manage. In fact, it would be cluttered with roles that are irrelevant to most of the databases.
Since we want to manage all roles from the server in one place, we needed to find a way to look at individual “names” to determine if a given role is assigned to them in a database or not. We’ll describe how to do this in the second solution.
The solutions
We would like to present three solutions to facilitate the management of roles, and we’ll highlight the advantages and disadvantages of each.
Solution #1
We have previously mentioned that displaying all roles as individual columns would make the main grid unpractical, which is why we ended up implementing the feature you’ll find in solution #2. However, in certain scenarios, and especially when it comes to reporting, it is essential to gather all this data (i.e. flags AND roles) in one interface for analysis. So we added a feature that allows the user to perform a special export, which will actually combine the flags and roles information the way we mentioned above.
Accessible from the right click menu directly, this option comes with both pre-formatted text file and HTML output possibilities. Note that the standard grid-specific export options can still be used here when it comes to reporting without your roles (learn more about grid export options).
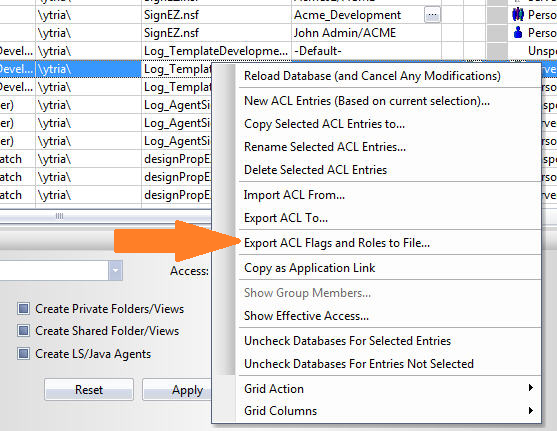
Fig. 1 – Exporting all ACLs, flags and roles from the right click menu
In the resulting report (Fig. 2), we have three possible values for all roles:
- 1 – role is present in the database and assigned to the current ACL entry
- 0 – role is present in the database but is not assigned to the current ACL entry
- n/a – role does not exist in this database
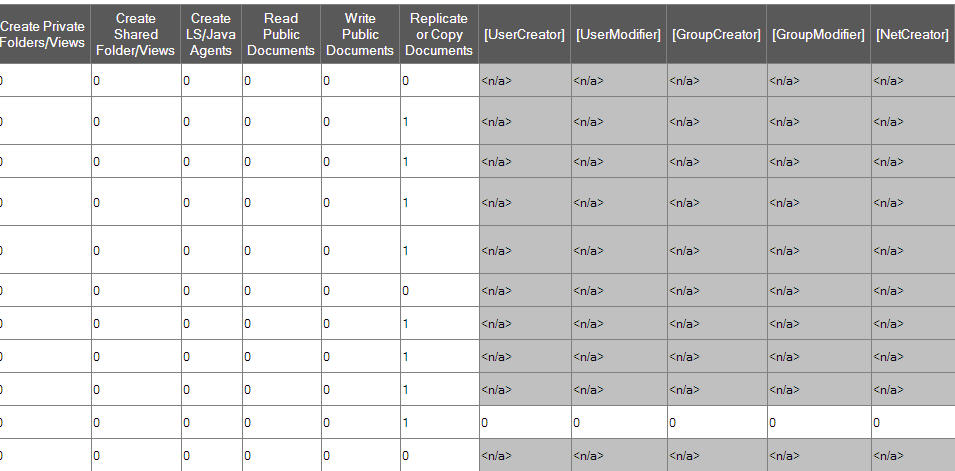
Fig. 2 – Exported HTML table of all ACLs, flags and roles
Note that you can easily transform any of the output files into an excel sheet (simple copy/paste or import), which will allow you to use further conditional formatting to mark the different values with colors to visually differentiate between them.
Solution #2
A second approach is to select the roles tab in aclEZ. Let’s explore this by going through the different components on the screenshot below for a clearer understanding (Fig. 3).
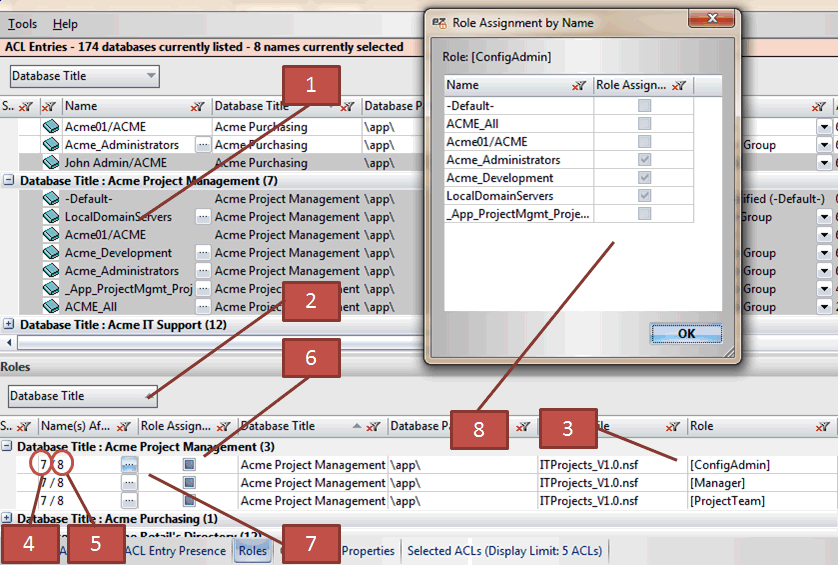
Fig. 3 – Components in main grid in aclEZ and “Roles” tab
- Use the main grid to select Names. Based on your selection (8 entries selected in this example), an array of names is built with the unique names found. You can then check these against all role assignments on the server in the Roles panel.
- Grouping using the Database Title in the Roles grid.
- Due to the grouping in step #2, it’s easy to quickly find all roles in this database.
- 7 is the number of names where the actual role (in this case [ConfigAdmin]) is relevant in this database. It’s displayed as 7/8 because there is one name selected that does not exist in the Project Management database’s ACL.
- 8 is the total number of ACL entries selected.
- This indicator checkbox shows if the current role is assigned to ALL, SOME or NONE of the selected ACL entries. In this case it shows “SOME”. You can perform a mass-modification across databases by directly setting the role assignments to “ALL” or “NONE” by clicking on the indicator checkbox.
- Clicking this button lets you examine the actual role assignment situation regarding the currently selected ACLs and the relevant roles.
- This is the window you get after step 7, which shows which of the ACL entries do have the current role assigned to them.
Regarding other role options, you can use aclEZ to manage it all. Adding, renaming and even deleting roles are all possible by right-clicking in the Roles tab (Fig. 3.5). See the product help for a detailed description on role management.
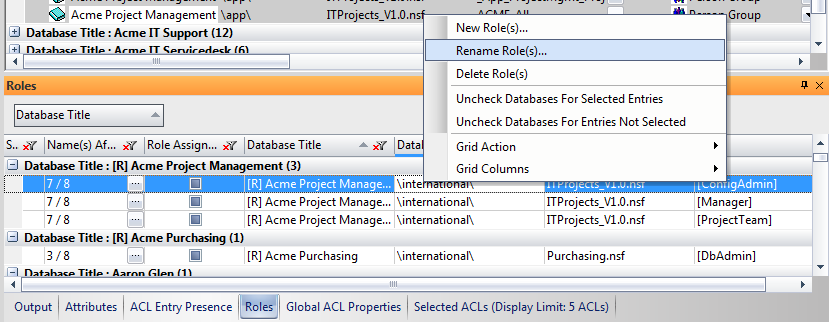
Fig. 3.5 – Adding, renaming and deleting roles from the right-click menu in the Roles tab
Solution #3
Our database content/document management tool, scanEZ, contains an embedded version of aclEZ. Contrary to aclEZ’s server-wide interface, the scanEZ ACL grid only deals with the current database’s ACL, thus allowing the display of roles for all ACL entries here (Fig. 4).
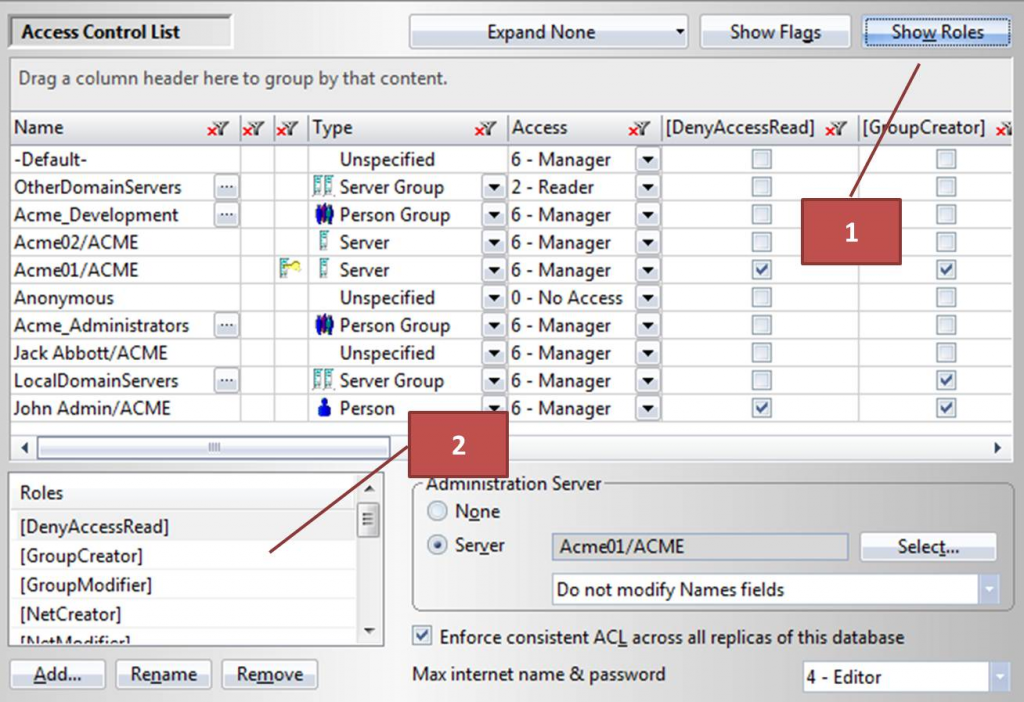
Fig. 4 – ACL grid in scanEZ displaying the current database’s ACL roles for all ACL entries
- Using the Show Roles button, you can switch to displaying all roles in the ACL grid where you’ll also be able to modify them.
- UIn the Roles window, you can add new roles, rename or remove them.
Note that you can still use the grid export features in this ACL grid or simply copy/paste from the grid to transform the data into a visually informative excel report of a given database’s ACL (use of conditional formatting based on the designated values) (Fig. 5).
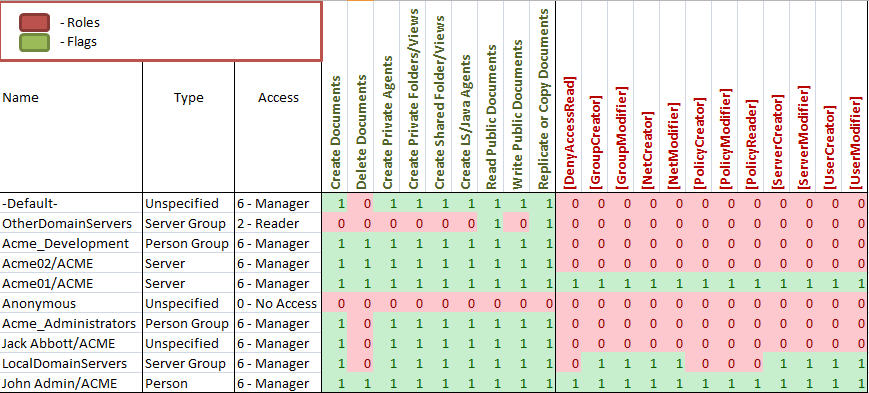
Fig. 5 – Excel report created from grid data
In conclusion, regardless of which option you go with, you get a clear and accurate picture of the status of your ACL entries and relevant roles with just a few clicks.
Learn more about the scanEZ ACL Interface in the product help.

Do you have a representative in Singapore who can meet with me and tell me more about this?