Important information you want to know about Microsoft Office 365 license assignment dates and audit logs

We recently published a blog on how to check Microsoft Office 365 license assignments. In this blog we explained several methods to obtain this information. One of our readers asked us if this could be done using audit logs, and if so, how is it done? The answer is yes, you can. You can learn all about Microsoft Office 365 audit logs here.
IT admins are always asked to create reports on a variety of data so they have to investigate if the information is available and where they can find it. If you’re asked to report on Microsoft Office 365 license assignment dates, you may have to get creative. You can get data from the admin audit log, but only information for the last 30 days is available.
If you need to go back further in time, you can look at the date when services (of a license) were enabled. This is available programmatically using PowerShell and the Microsoft Graph API. This will take you some time, but you can use sapio365 to create that report in just a few clicks. Let’s examine each method.
Audit Logs in the Microsoft Office 365 portal
As with most administration actions, assigning or removing a license is logged in the Admin Audit Log and also in the Search Audit Log. The main differences between the two is their data retention period and that the Admin Audit Log only includes admin activities while the Search Audit Log comprises all types of activities.
Search license management actions in the Admin Audit Log
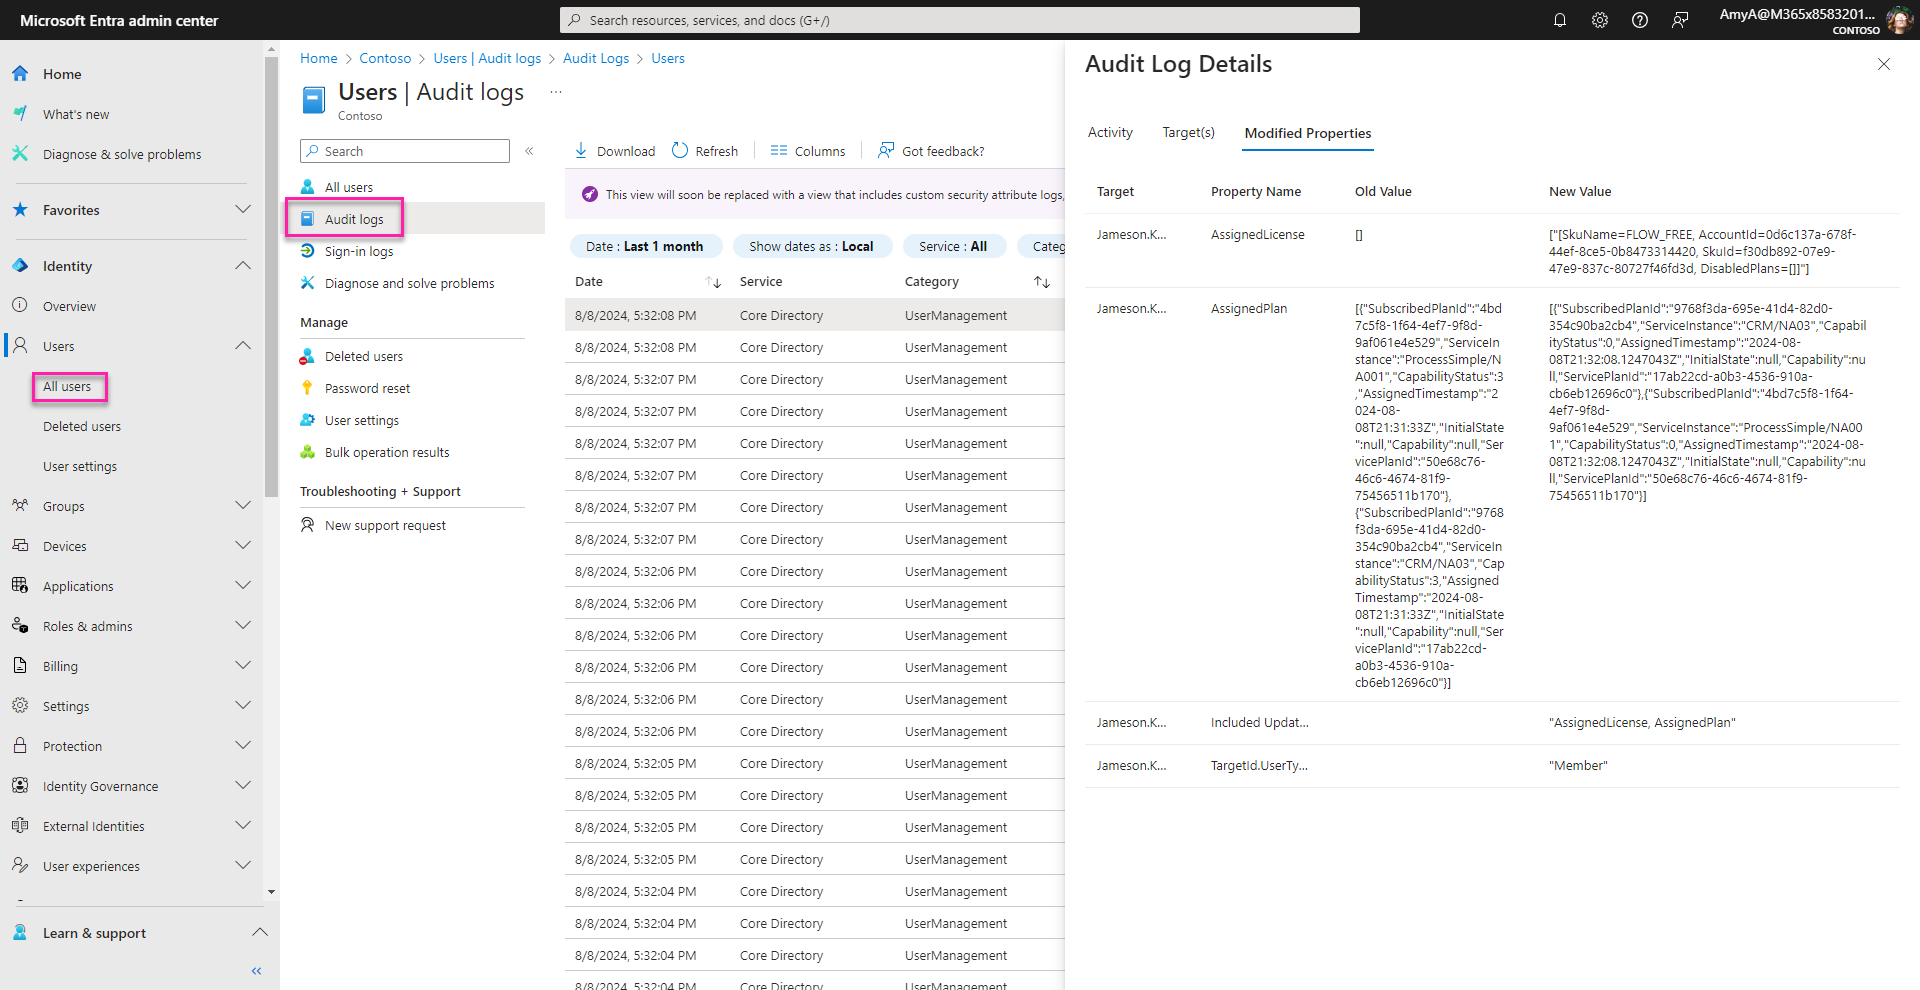
The Admin Audit Log can be found in in the Entra Admin Centre, in the sections for Users, Groups, etc… For each section, there is a filter applied on the category which you can remove. Example, under Users, the category set by default is “UserManagement”.
You can use a filter on the license activity to list only the license management-related activities. To see the license information, you must click on each activity.
Create a query for the Search Audit Log
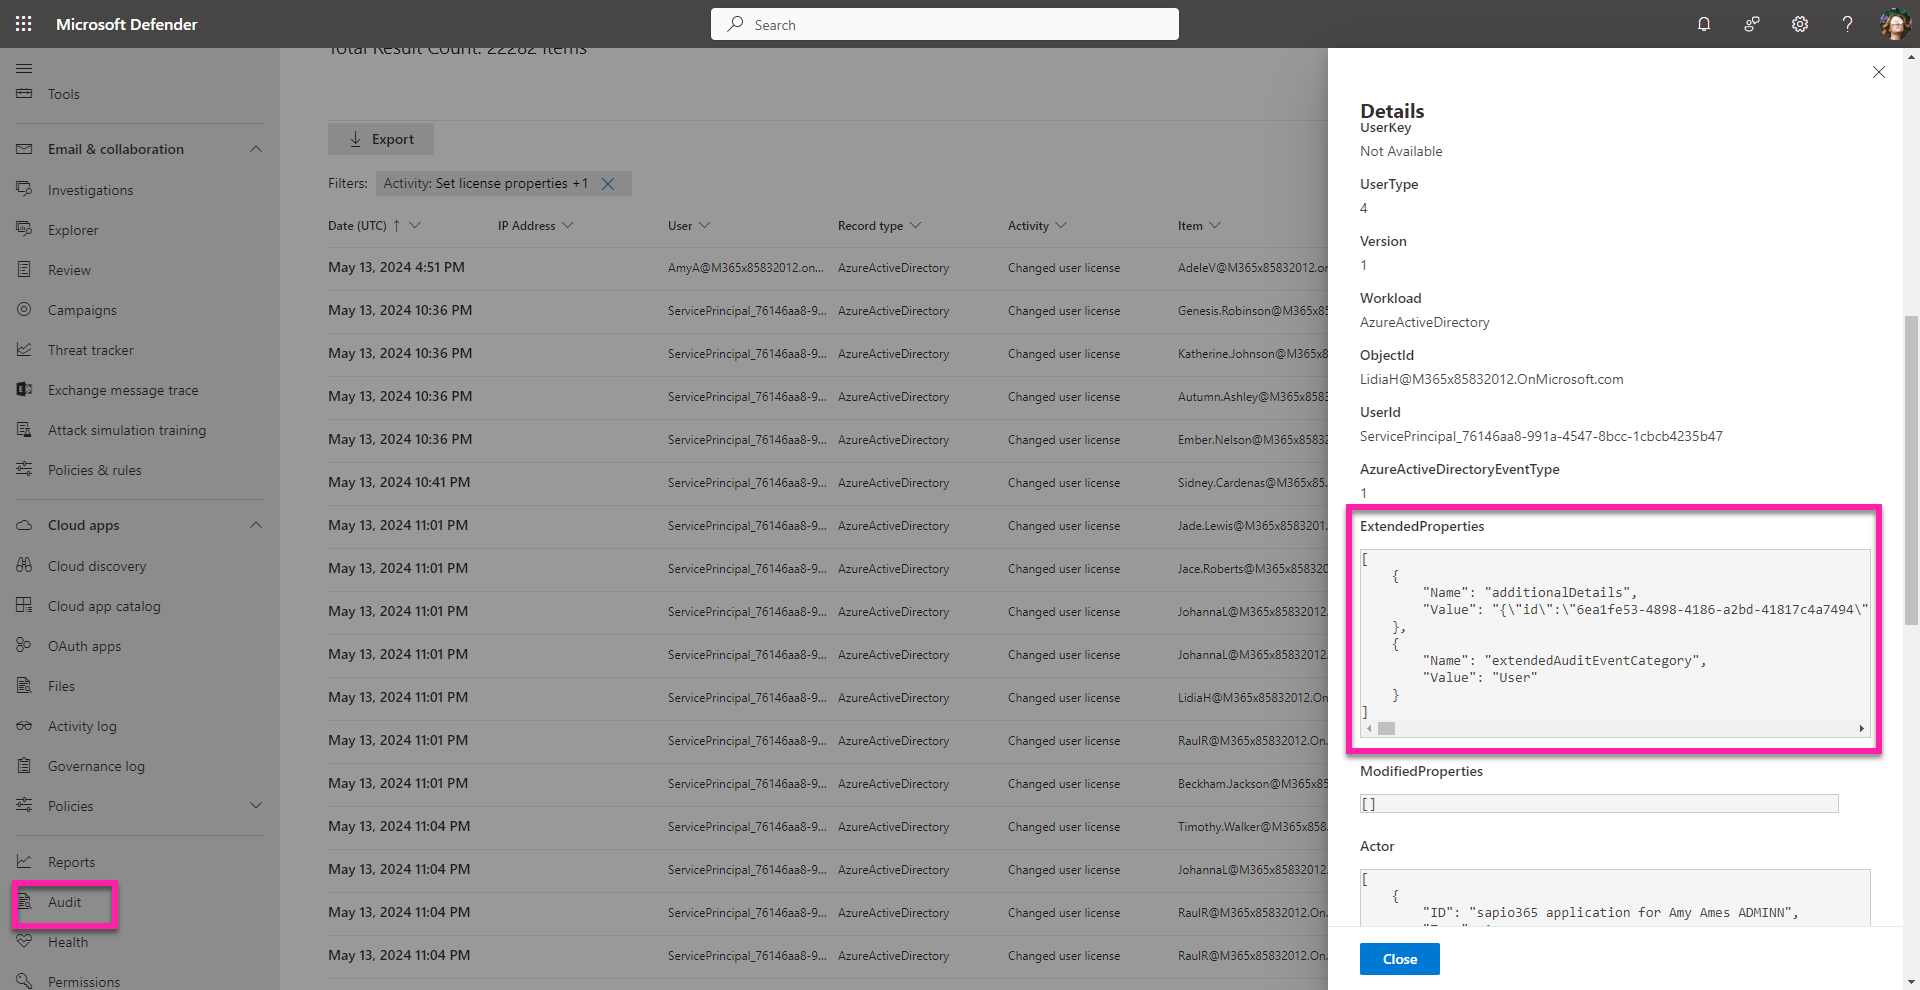
The Search Audit Log comprises both administrative actions and user actions. It can be found in Microsoft Defender under Audit.
The good news: the data is retained for longer.
The bad news: it’s even more difficult to find information like Office 365 license assignment. You’ll need to look at the details of each event by clicking on it, and then try to find what’s been changed in the Extended Properties window.
In both types of Audit Log reports, there is a lot of information there to unpack. Of course, you can use various filters to isolate license management actions.
Limitations of the Microsoft 365 Audit Logs
As mentioned before, Admin Audit Logs contain a lot of data, and it’s not easy to identify if a license was being assigned. But the bigger issue is that the Admin Audit Log is only retained for 30 days while the Search Audit Log varies between 90 and 365 days depending on licensing and the Microsoft Entra data retention policies.
But what if your user accounts are older than that?
As mentioned previous article “How to audit Microsoft Office 365 license assignments”, if you consider that the Office 365 license assignment date can be represented by the oldest date when one of the services plans was enabled, then you can query for the ‘Service Assigned Date’ property.
Create an Office 365 license assignment report with PowerShell
If you’re looking at newer accounts and prefer to consult the Audit Logs, you can use the following PowerShell cmdlet: Search-UnifiedAuditLog. Its parameters can be found on this page.
Alternatively, you can query the Admin Audit Log with Microsoft Graph API: GET https://graph.microsoft.com/v1.0/auditLogs/directoryAudits. More information on this API can be found on this page.
Both these methods result in copious amounts of data, and parsing it is no small feat. See how sapio365 can help in the next section.
Alternative ways to find Office 365 license assignment dates
Luckily, you have the option of using a third-party software tool, like sapio365, to create an Office 365 license assignment report.
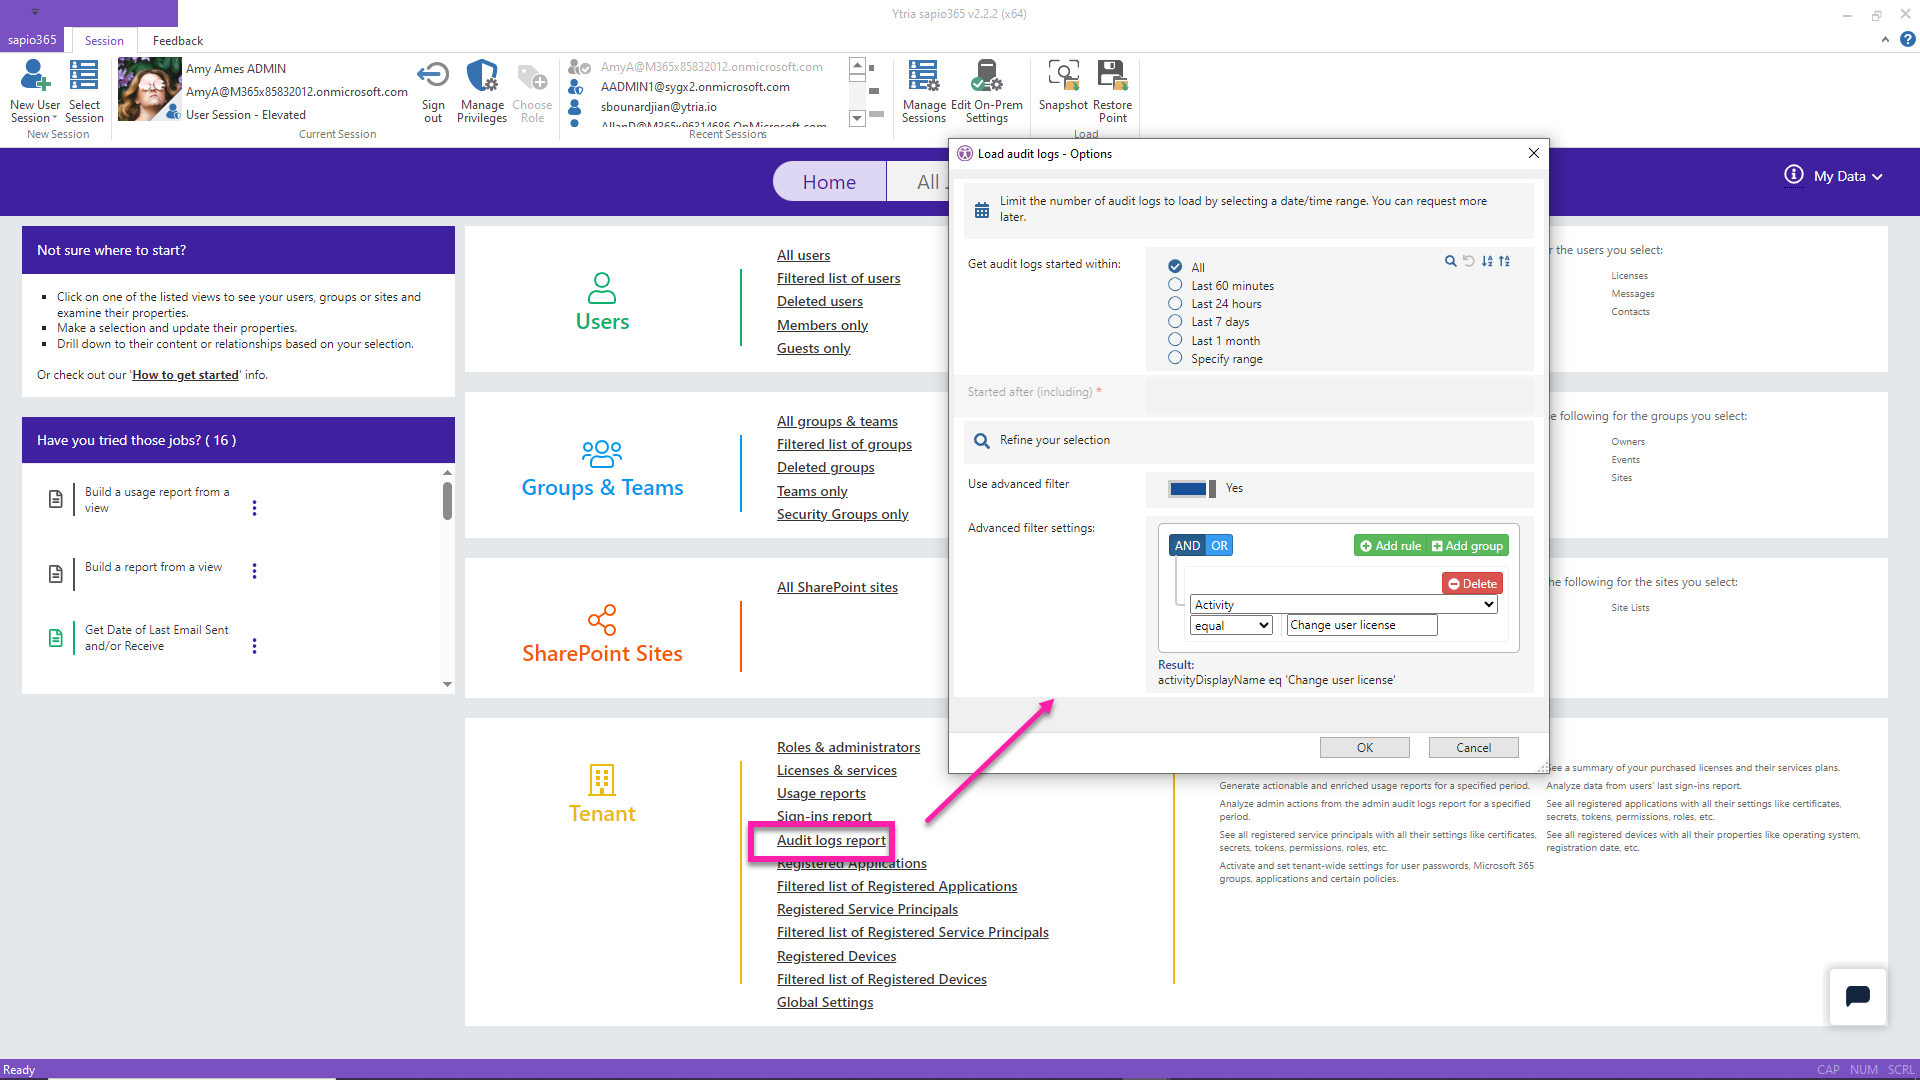
To access the Admin Audit Log in sapio365, go to the homepage and click on Audit Logs. If you have a high volume of admin activity (by people or by the system), you can limit the results by selecting a narrow date range or by using advanced filters (set it to equal “Change user license”).
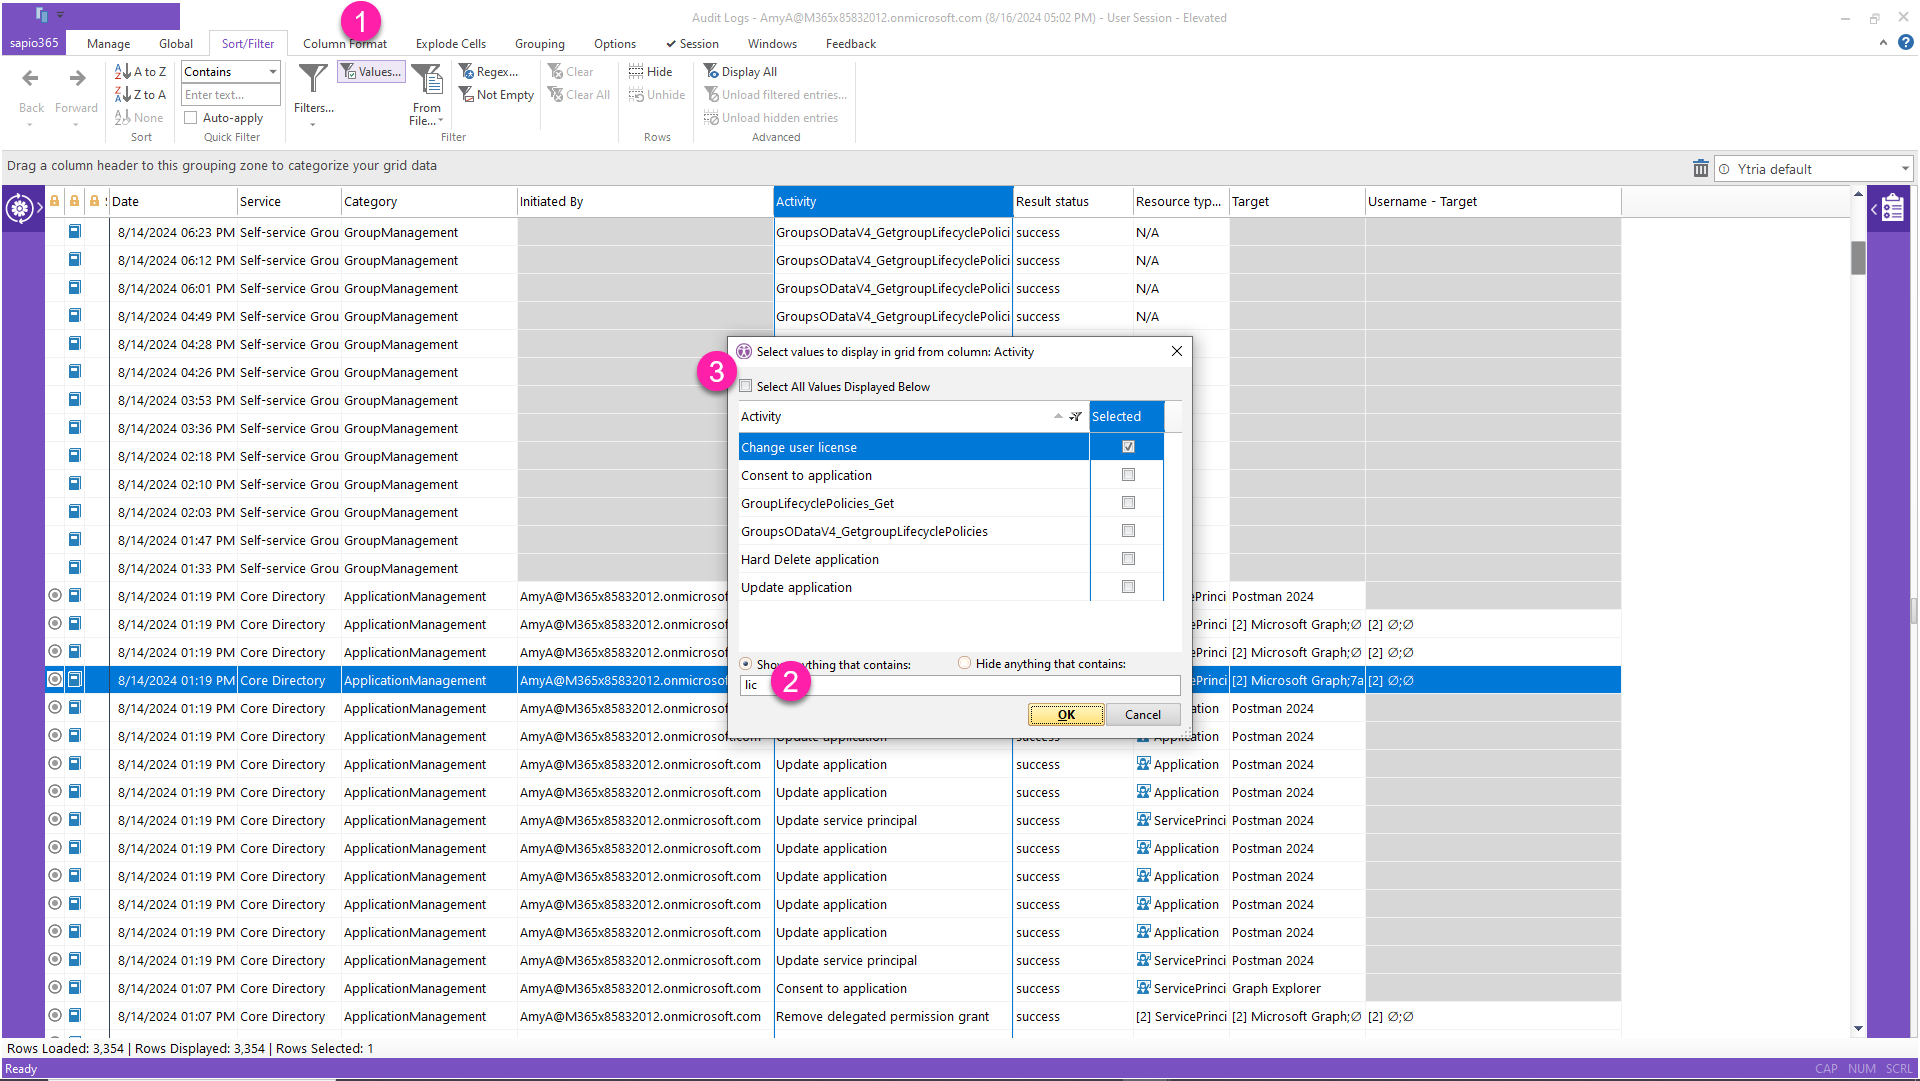
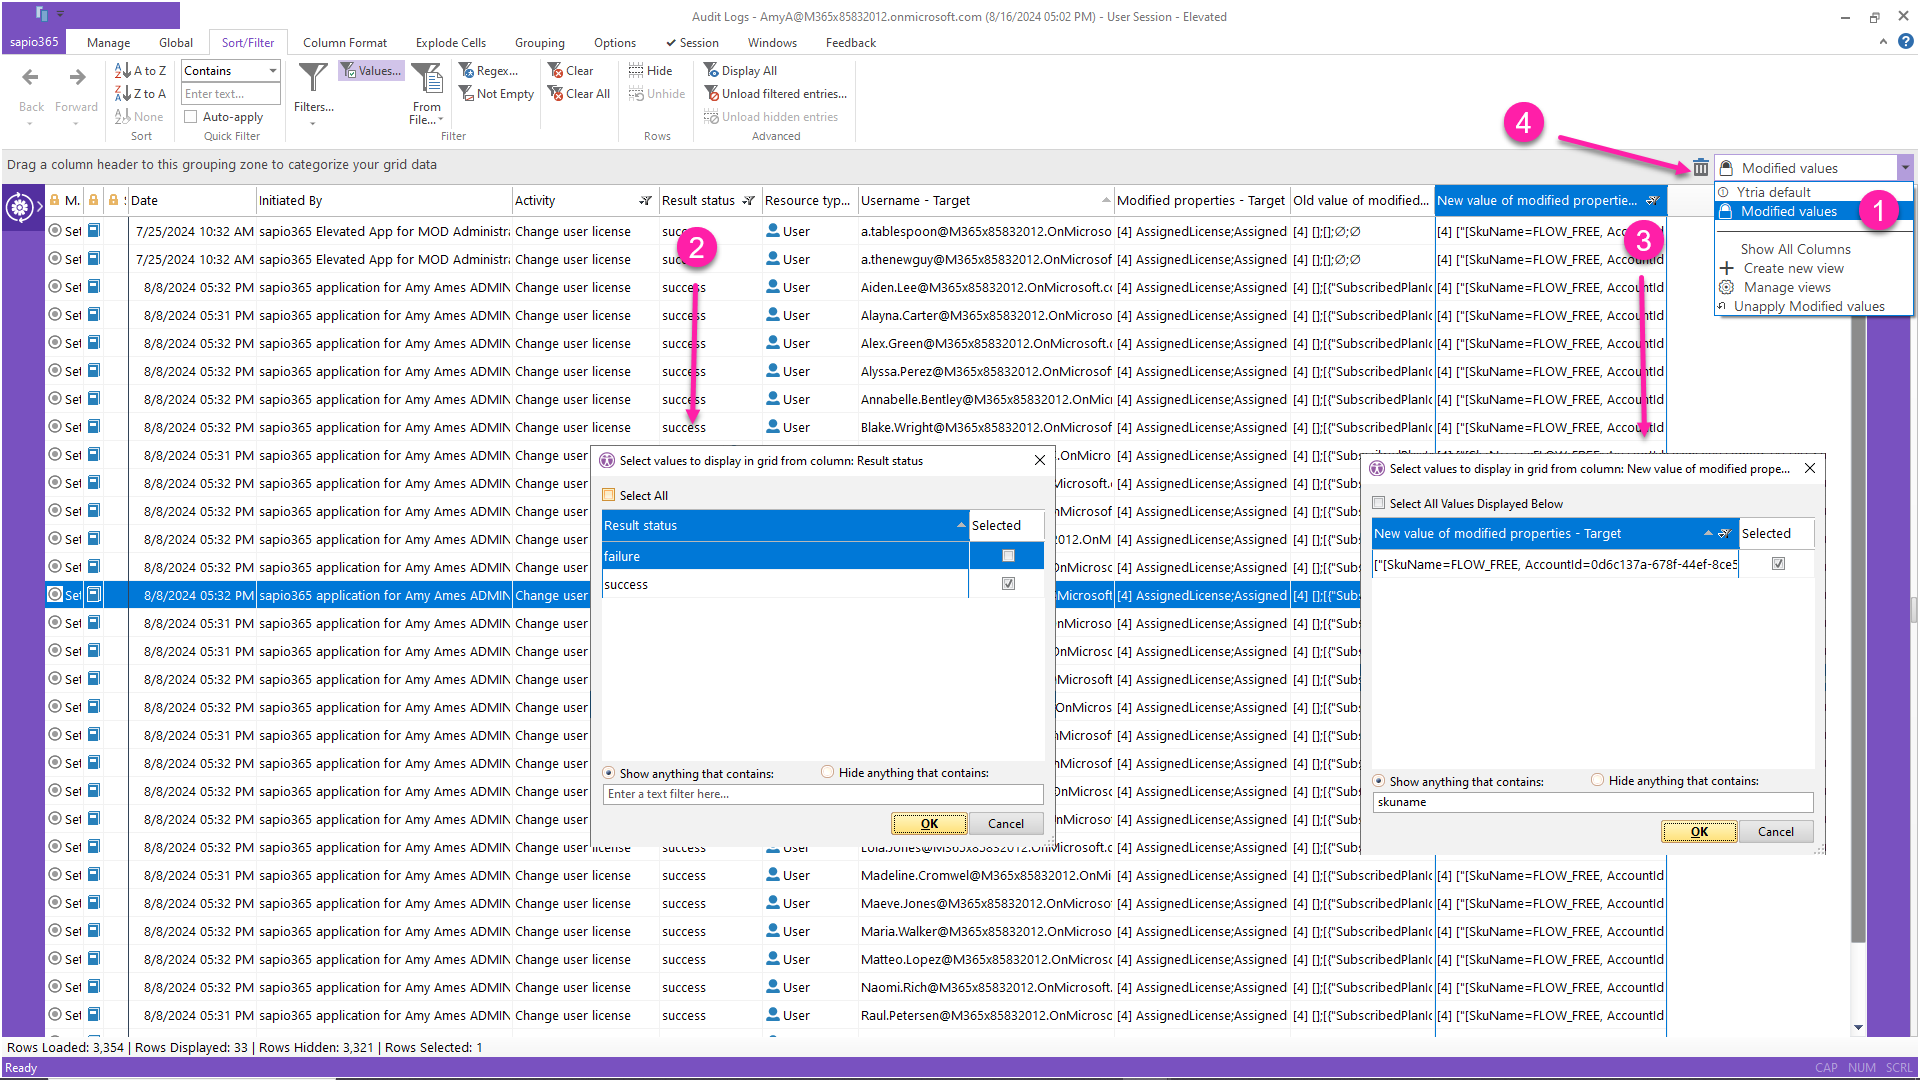
If you didn’t use the advanced filters, you can filter the results afterwards by the values of the Activity column.
- Bring the Activity column into focus by clicking a cell and apply a value filter from the Sort/Filter tab in the ribbon. You can also do this by right clicking the column header.
- Type “lic” to limit values that are related to licenses.
- Unselect “Select All” and only select “Change user license”.
Next, customize the view by filtering out unnecessary events and by removing extraneous columns.
- Switch to a view that shows the values that were changed.
- Filter out the failures with another filter value.
- Filter out the new values to retain only the license name (skuname).
- Remove some columns to clean up the view by dragging them to the trash can icon at the top of grid on the right.
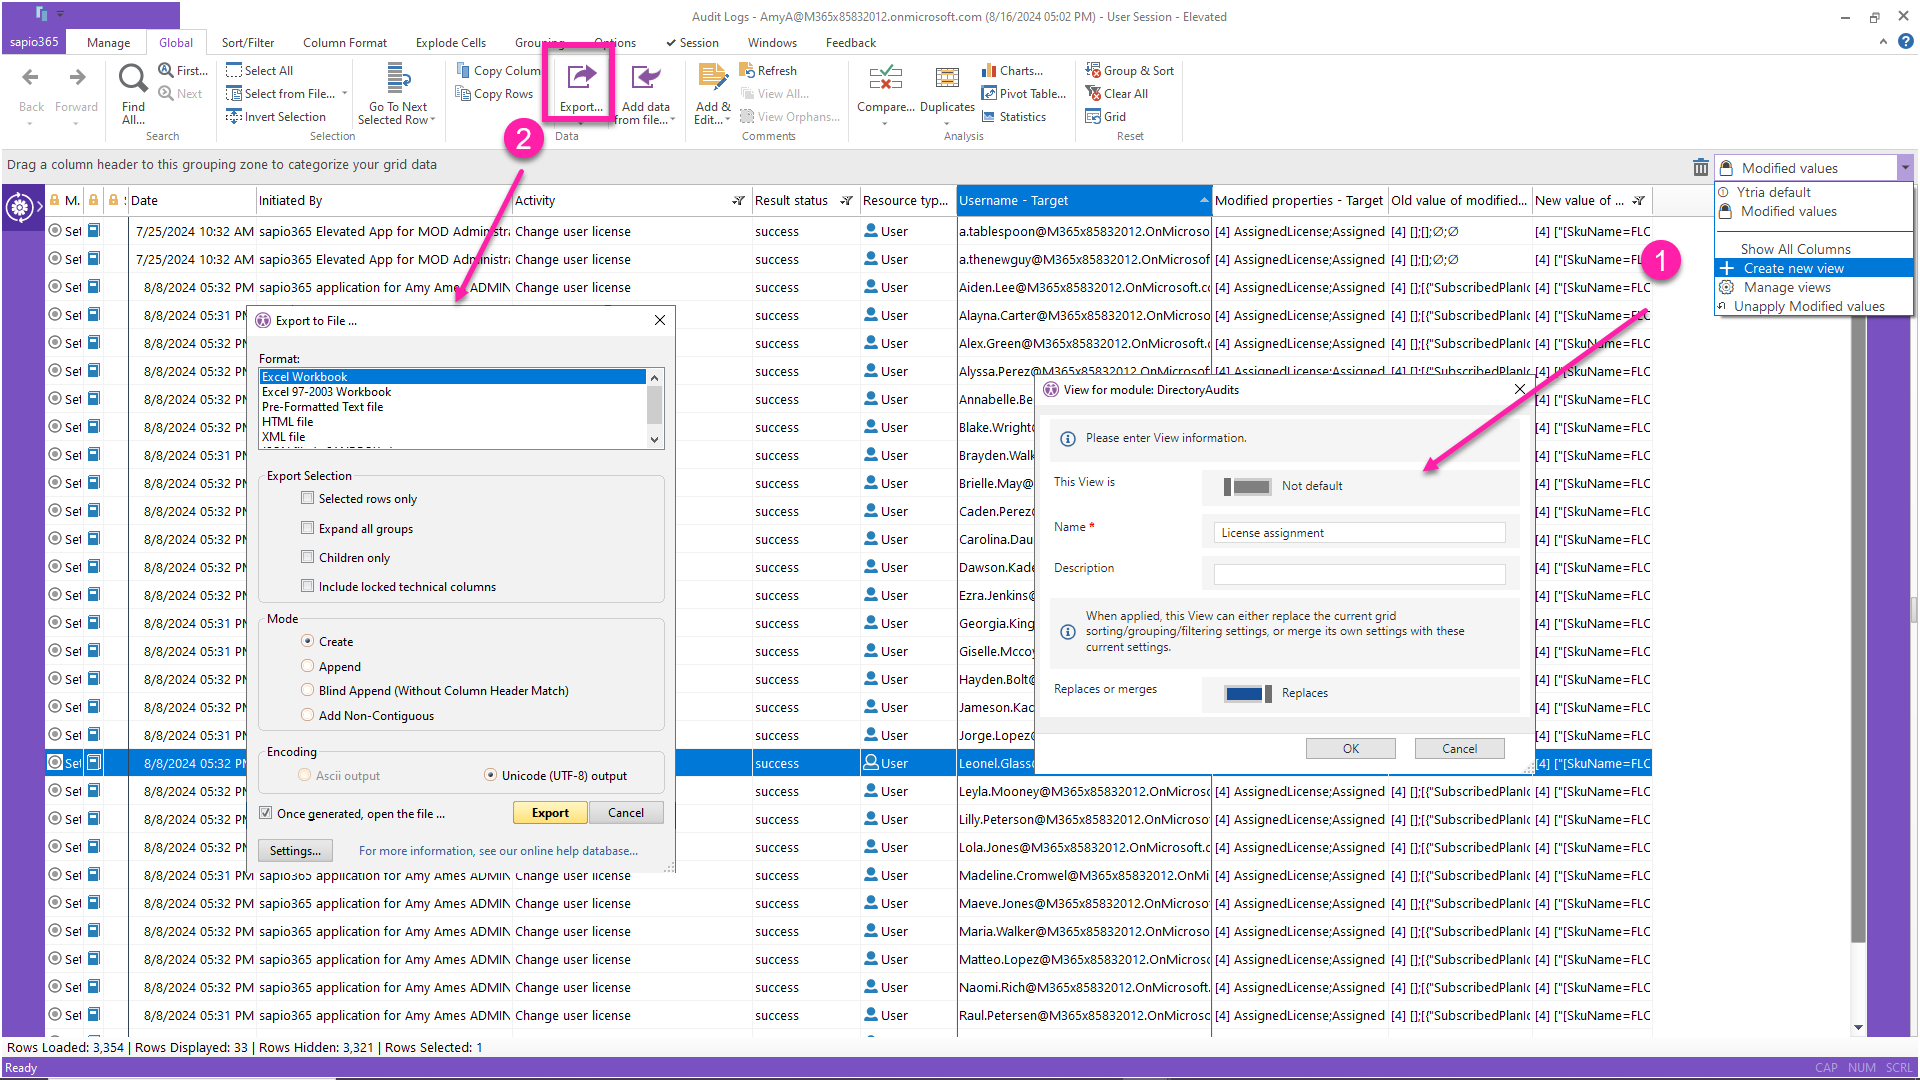
So now you have the date of the Office 365 license assignment, the license, and who it was assigned by (in this case, it was Amy’s sapio365 application). When you’re satisfied with the format of the view, you can:
- Save the view. It will be added to the view list. Switching to it will apply all the filters, formatting and displayed columns that you included in the grid view.
- Export the view to an Excel file from the Global tab in the ribbon.
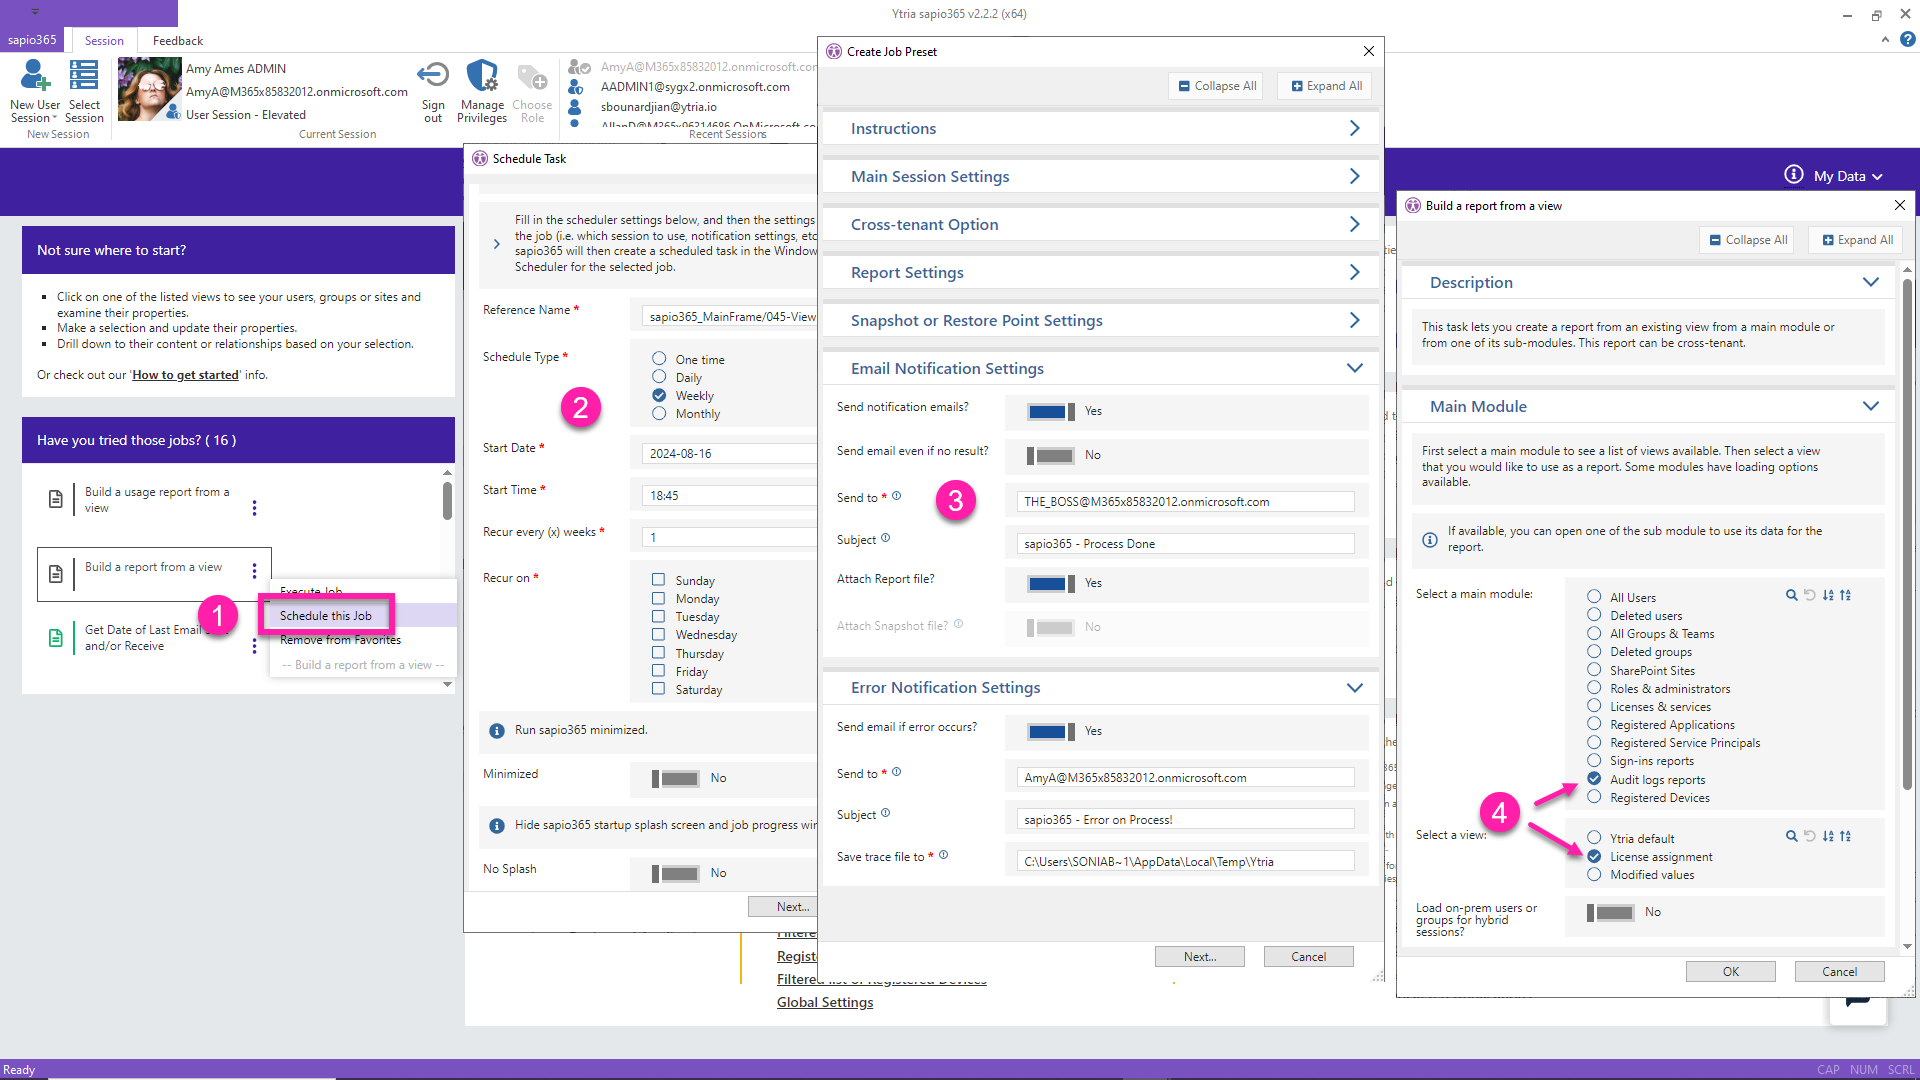
Additionally, you can schedule to run this view, export it to Excel and email it as an attachment to a list of email addresses.
- From the main sapio365 view, click on the automated job “Build a report from a view”.
- Schedule the report.
- Enter the email address of your manager or whoever you want to send the license report to and update the subject line with something meaningful.
- Select the module “Audit Logs Reports” and then the custom view you saved.
Conclusion
You now have a few options to create a report on Office 365 license assignments. You can use the Microsoft portal, or you can use PowerShell, but both methods require time and skill. If you choose to use sapio365, you can save a lot of time and get your report in a few clicks.
With sapio365, you get full visibility of all your data in one place without pagination issues or having to bounce from screen to screen.
Once the data is at your fingertips, you can drill down to find whatever it is you’re looking for, and once you’re ready to make changes, you can preview those changes before committing to them This eliminates the chance of unexpected errors messing up your environment.
The bonus is that sapio365 comes with some great automations and a great way to delegate tasks safely. In addition to Microsoft Office 365 license assignment reporting, why not discover all the capabilities that sapio365 has to offer?


Submit a comment