An advanced scanEZ trick for performing a search-and-replace across a Lotus Notes database
A scanEZ user recently contacted us with this excellent question:
“Is scanEZ able to search and replace a specific string within all documents of a Lotus Notes database? We are soon to undergo a User OU migration project and this functionality would really help us to manage our applications throughout the project. We need to find references of a given username and replace it with the new OU structure. For example find “CN=John Doe/OU=IT/O=ACME”and replace to “CN=John Doe/OU=UK/O=MEGACORP” ?”
We were happy to tell him that, yes, it is possible. And here’s how it’s done…
Part One: Getting the Document Selection
First off, we need to use scanEZ’s Search by Formula function (in the Search menu).
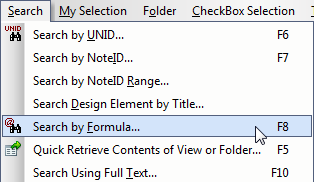
The Search by Formula option in scanEZ
Then we must input the following formula. It will look for any documents with fields containing a given name (e.g. “Alfred Test1″) and place the resulting documents in a ‘My Selection‘ virtual folder. With this formula, we’re basically gathering a list of fields for each document and looking inside them to see if our “Alfred Test1″ string is present. We added an additional condition to skip any case where the string is present in the $UpdatedBy item. We’re doing this because this is a special, un-editable item. (Note: This is just a ‘quick and dirty’ formula that’s quite adequate for the task at hand—we could have tweaked it for better efficiency by making the search move on to another document after the first field value match).
tSearch:=“Alfred Test1″;
tList:=@DocFields;
tRet:=@False;
@For(n :=1; n<=@Elements(tList); n:= n + 1;
tValue:=@Text(@GetField(tList[n]));
tRet:=tRet|(tList[n]!=“$UpdatedBy” & @Contains(tValue;tSearch))
);
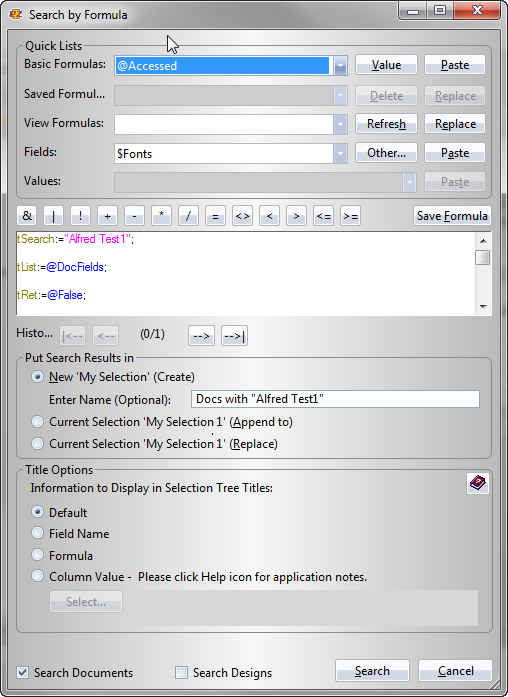
This is where we enter our formula to find instances of ‘Alfred Test1′
Part Two: Investigating the Scope of the Job at Hand
We now have a selection of documents which all contain at least one field with the string that we hope to change. But before go ahead an process anything, it’s nice to get an idea of what is going to be changed. Here is where scanEZ’s ability to simulate applying a formula comes in very handy. So we created the formula below to show us precisely which fields, in which documents, need updating.
We can use this same formula either in the ‘Change Displayed Titles‘ (using formula) in the Selection Tree or in the ‘Add Custom Column‘ feature in the Values dialog (access by clicking the Values button in the Diff panel). The former lays things out right in front of our eyes and the latter puts the information in a grid that we can sort or export to a spreadsheet. In either case we must be sure that the MySelection virtual folder we created in step one is highlighted.
tSearch:=“Alfred Test1″;
tList:=@DocFields;
tRet:=“”;
@For(n :=1; n<=@Elements(tList); n:= n + 1;
tValue:=@Text(@GetField(tList[n]));
tRet:=tRet:@If(tList[n]!=“$UpdatedBy” & @Contains(tValue;tSearch); tList[n]; “”)
);
@Trim(tRet)
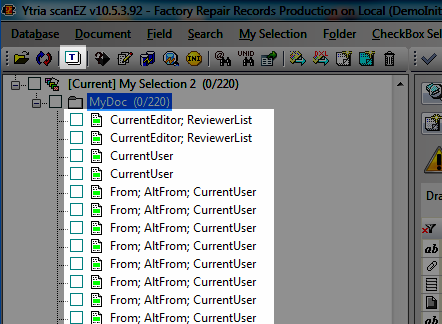
Here are the results of our formula when used with the ‘Change Displayed Title’ feature; the document titles represent the fields that require changes
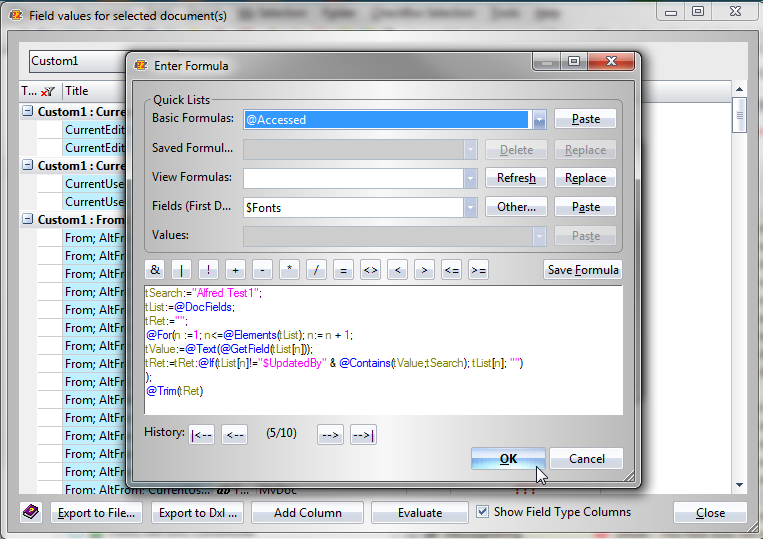
After selecting our MySelection created in step one, we’ll see the Diff Panel. From here we can click the Values button to see the Values dialog. We’ll want to click the ‘Add Custom Column’ button here and enter our formula
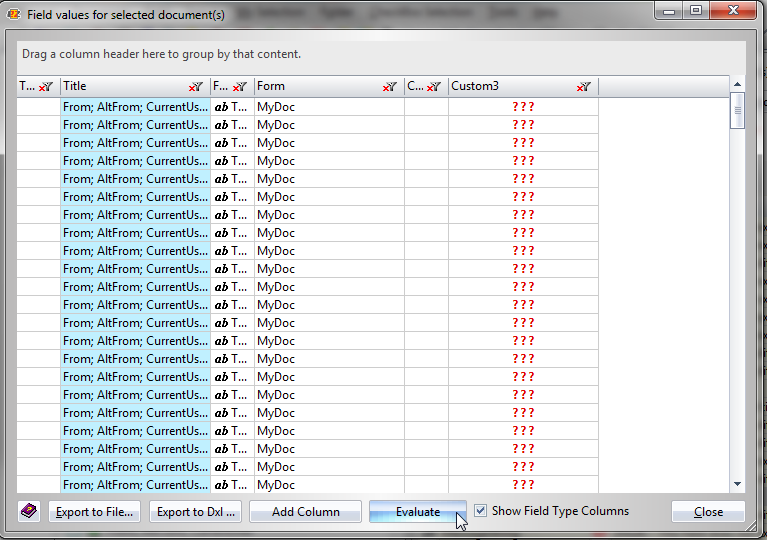
After entering the Custom column, you’ll see a string ‘???’ characters until you click ‘evaluate.’
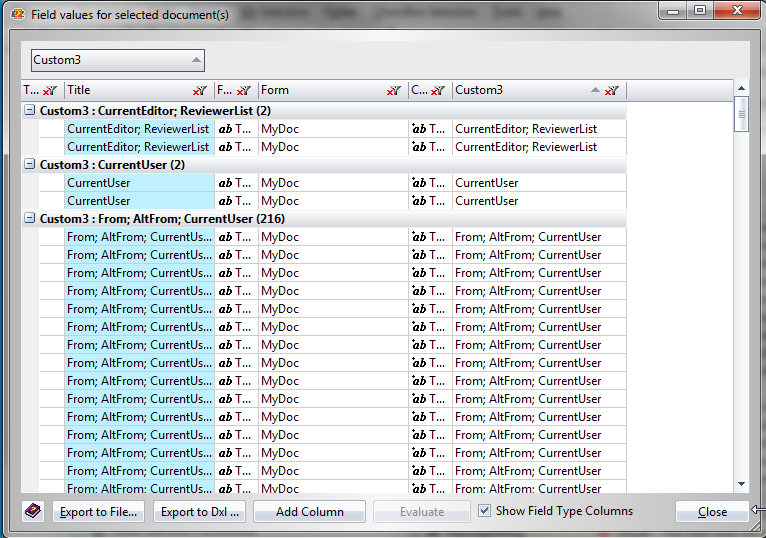
After evaluating the column, you’ll see the fields that require changing in each document. You can group by the custom column to get a better idea of the full extent of the changes required. You can also copy the grid to a spreadsheet.
Part Three: The Search and Replace Operation
Now we have our select and we know the full scope of the changes to be made. It’s time to make the changes.
To do so we start by selecting the MySelection virtual folder containing the search results created in part one. This takes you to the Diff Panel. From here you’ll need to click the Diff button to perform a compare/contrast operation on the fields of the documents retrieved.
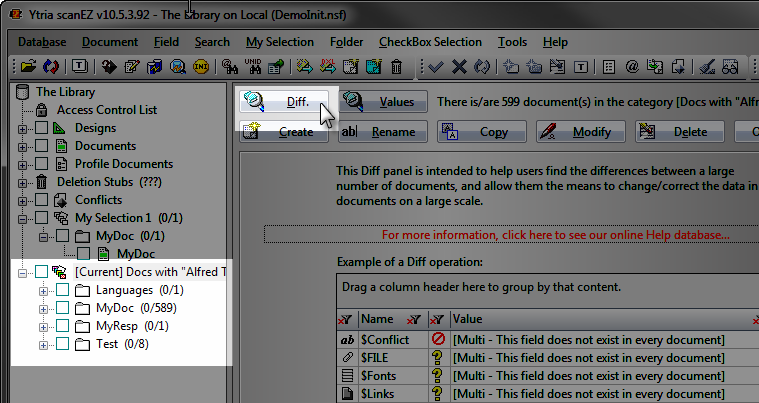
This screen shows how we perform a ‘Diff’ operation on a MySelection virtual folder in scanEZ
After this Diff operation is completed, you should see a list of all the items that appear in at least one of the documents.
Now here’s where it gets interesting… We want to replace all instances of “Alfred Test1″ with “John Doe” but we have no way of knowing which fields require modification. The workaround is finding an item that we’re sure will be in every document. This item will serve as a sort of ‘anchor.’ We’ll use the ‘form’ item as this anchor. With the ‘Form’ item selected, we’ll now click the Modify button, and add the following formula:
tSearch:=“Alfred Test1″; tNew:=“John Doe”; tList:=@DocFields; @For(n :=1; n<=@Elements(tList); n:= n + 1;
tValue:=@GetField(tList[n]);
@If(tList[n] =”$UpdatedBy” | !@Contains(tValue;tSearch);
“”;
@SetField(tList[n];@ReplaceSubstring(tValue;tSearch;tNew))
)
); Form
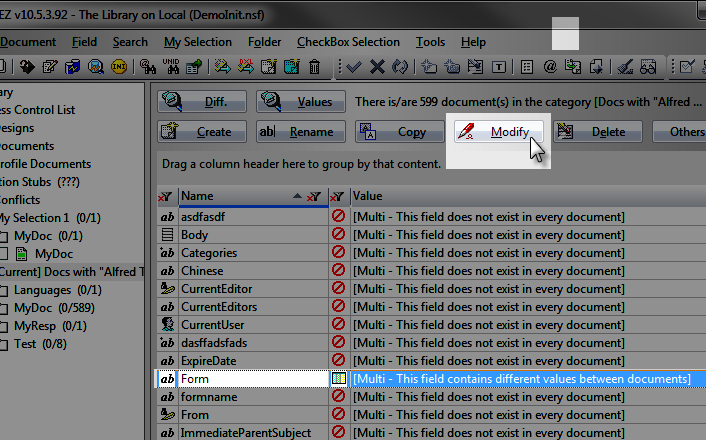
We need to select the ‘Form’ item and click ‘Modify’…
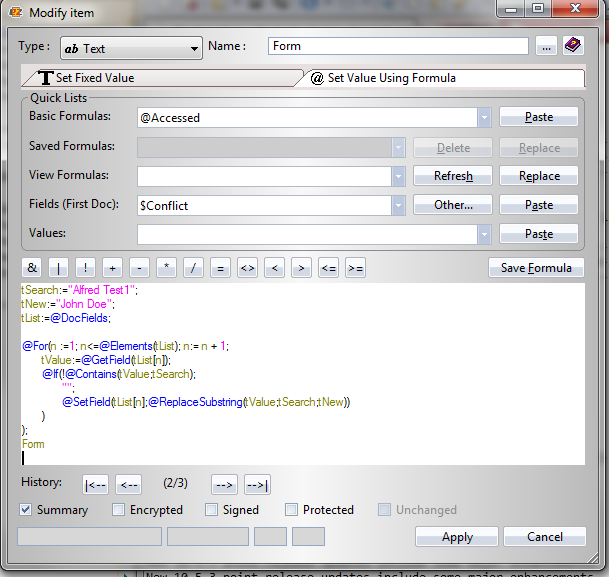
…and in this dialog we enter the formula which doesn’t actually change the form item, but rather finds and replaces all instances of the string that needs updating.
The nice thing here is that the “Form” item will not be modified but all the instances of “Alfred Test1″ will be replaced with “John Doe”. The screenshot below shows the Item List for an example document modified by the formula we entered:
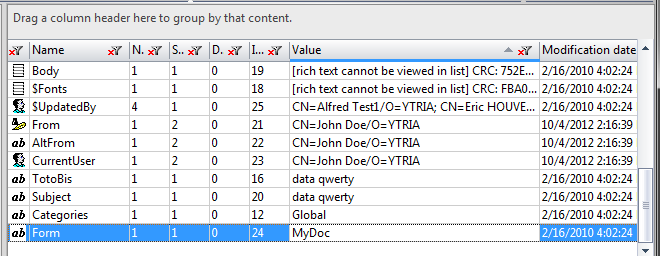
This screenshot shows the Item list of one of the documents modified in this tip.Note the following:
a) the ‘Form’ item was untouched
b) the instances of ‘Alfred Test1′ were all replaced with “John Doe”…
c) …with the one exception being the special, un-editable ‘$UpdatedBy’ item

I find @Transform a more appropriate tool than @For for jobs like this.
For example the search can be replaced by just this.
[cc]
@Transform(@Docfields; “_x”;
@If(_x = “$UpdatedBy”; @False; @Contains(@Text(@GetField(_x)); “Alfred Test1”))
);
[/cc]
Which also has a speed optimization applied as it skips the @GetField and the @Contains search on the $UpdatedBy field (rather than doing it, and then just ignoring the result).
As for the part 2 formula, it becomes…
[cc]
@Transform(@Docfields; “_x”;
@If(
_x = “$UpdatedBy”;
@Nothing;
@Contains(@Text(@GetField(_x)); “Alfred Test1”);
_x;
@Nothing
)
);
[/cc]
No @Trim needed and again @GetField and @Contains are skipped for the $UpdatedBy field.
As for the part 3 code why are you performing the text search twice? Once using @Contains and then again using @ReplaceSubString. Isn’t this a bit inefficient when it can be done with only one text search?
[cc]
@Transform(@Docfields; “_x”;
@If(
_x = “$UpdatedBy”;
;
@Do(
_v := @GetField(_x);
@If(
@IsText(_v);
@SetField(_x; @ReplaceSubString(_v; “Alfred Test1”; “John Doe”) );
)
)
)
);
Form
[/cc]
Again this skips $UpdatedBy without doing unnecessary @GetField and @Contains on it.
And as a matter of interest why doesn’t scanEZ work with @ThisValue?
And why doesn’t it have the ability to run an update formula without having to select a field? And why doesn’t it have the ability to edit multi-valued text fields where individual values contain line breaks?
Would not a table interface be a better way of editing multi-valued fields rather than a single text box and a nominated separator?
The search can be made even more efficient…
[cc]
@Transform(@Docfields; “_x”;
@If(
_x = “$UpdatedBy”;
@False;
@Do(
_v := @GetField(_x);
@If(
@IsText(_v);
@Contains(_v; “Alfred Test1”);
@False
)
)
)
);
[/cc]
This not only skips the $UpdatedBy field but also date and number fields. @Contains is expensive and should be avoided if possible.
This is an even more efficient search. It stops scanning the remaining fields in the document if it finds a match. It also skips $UpdatedBy and number/date fields.
[cc]
_fL := @DocFields;
_found := @False;
_i := @Elements(_fL);
@While(
(_i > 0) & !_found;
@If(
_fL[_i] = “$UpdatedBy”;
;
@Do(
_v := @GetField(_fL[_i]);
@If(
@IsText(_v);
_found := @Contains(_v; “Alfred Test1”);
)
)
);
_i := _i – 1
);
_found
[/cc]
Hello James,
First of all, thanks for the great input, we’re always happy to get feedback & suggestions from customers!
Let me address your questions one by one.
Regarding the code, what we offered was just meant to give you an idea as to how this complex search can be achieved, but your suggestion is highly appreciated, and you are right: the @Transform is indeed better from the performance viewpoint here.
Regarding your questions about scanEZ:
– Why doesn’t scanEZ support the @Thisvalue formula?
Both the @Thisvalue and @ThisName are special formula functions that only work in one situation: when they are part of a field on a form. Since these functions always return null when placed outside a field formula, and scanEZ always evaluates formulas on a given document, they are not supported.
– Why can’t we run an update formula without having to select a field?
When we built scanEZ, we wanted to ensure that we always make use of the return value of any formulas (This is what we normally use when updating a selected item’s value). Note that you still have the ability to set the value for multiple items using one formula, as long as you keep an eye on the fact that the return value will be used as the currently selected item’s new value.
– Why doesn’t scanEZ have the ability to edit multi-valued text fields where individual entries contain line breaks? Wouldn’t it be better to use a table instead of a text box with the given separator?
We handle multi-value fields the same way Notes does; to make it a bit more friendly, scanEZ allows you to dynamically change the separator used for displaying the item values. We believe that a text box offers more flexibility here, but we noted your suggestion, and will look into implementing an additional grid-style display option.
Should you have any further questions or suggestions, please send us an email at: support@ytria.com,
Thanks again for taking the time to let us know what you think – this is how we can make our products even better.