How to remove private and shared Teams channel members from multiple Teams

Teams are great for sharing and collaboration but IT admins may face challenges removing users’ access to the content stored in specific types of Teams. It’s easy to revoke access to standard Teams but when it comes to removing access from private or shared channels, it can get a little tricky. With private channels, you will have difficulty in removing users without also removing them from the Teams. In the case of shared channels, the users may not be actual members of the Teams, so all Teams channels will have to be examined.
In case you’re not sure, we already took a look at the differences between standard, private and shared channels in our blog on finding Teams private channels.
Now, we’ll look at how to find shared channels, examine the users/members and remove the targeted Teams channel members from private and shared Teams. You will need to be aware that if the user you want to remove is the last owner of the private channel, you will not be able to remove them.
You have the option of using the Teams admin center, but it will require that you go through each channel and manually remove the users. Alternatively, you can use PowerShell to do this for every Team in the tenant. Your final option is to use a third-party software tool to remove these Teams channel members.
Remove Teams channel members using the Teams Admin Center
To manage your Teams channels’ members, you must do so from the Teams Admin Center. From there, you can go to the ‘Manage’ section to see a list of all the Teams, and whether they have any private and shared channels. Unlike sapio365 (see the last section of this article), at first glance you won’t be able to know if the shared channels are internal or external.
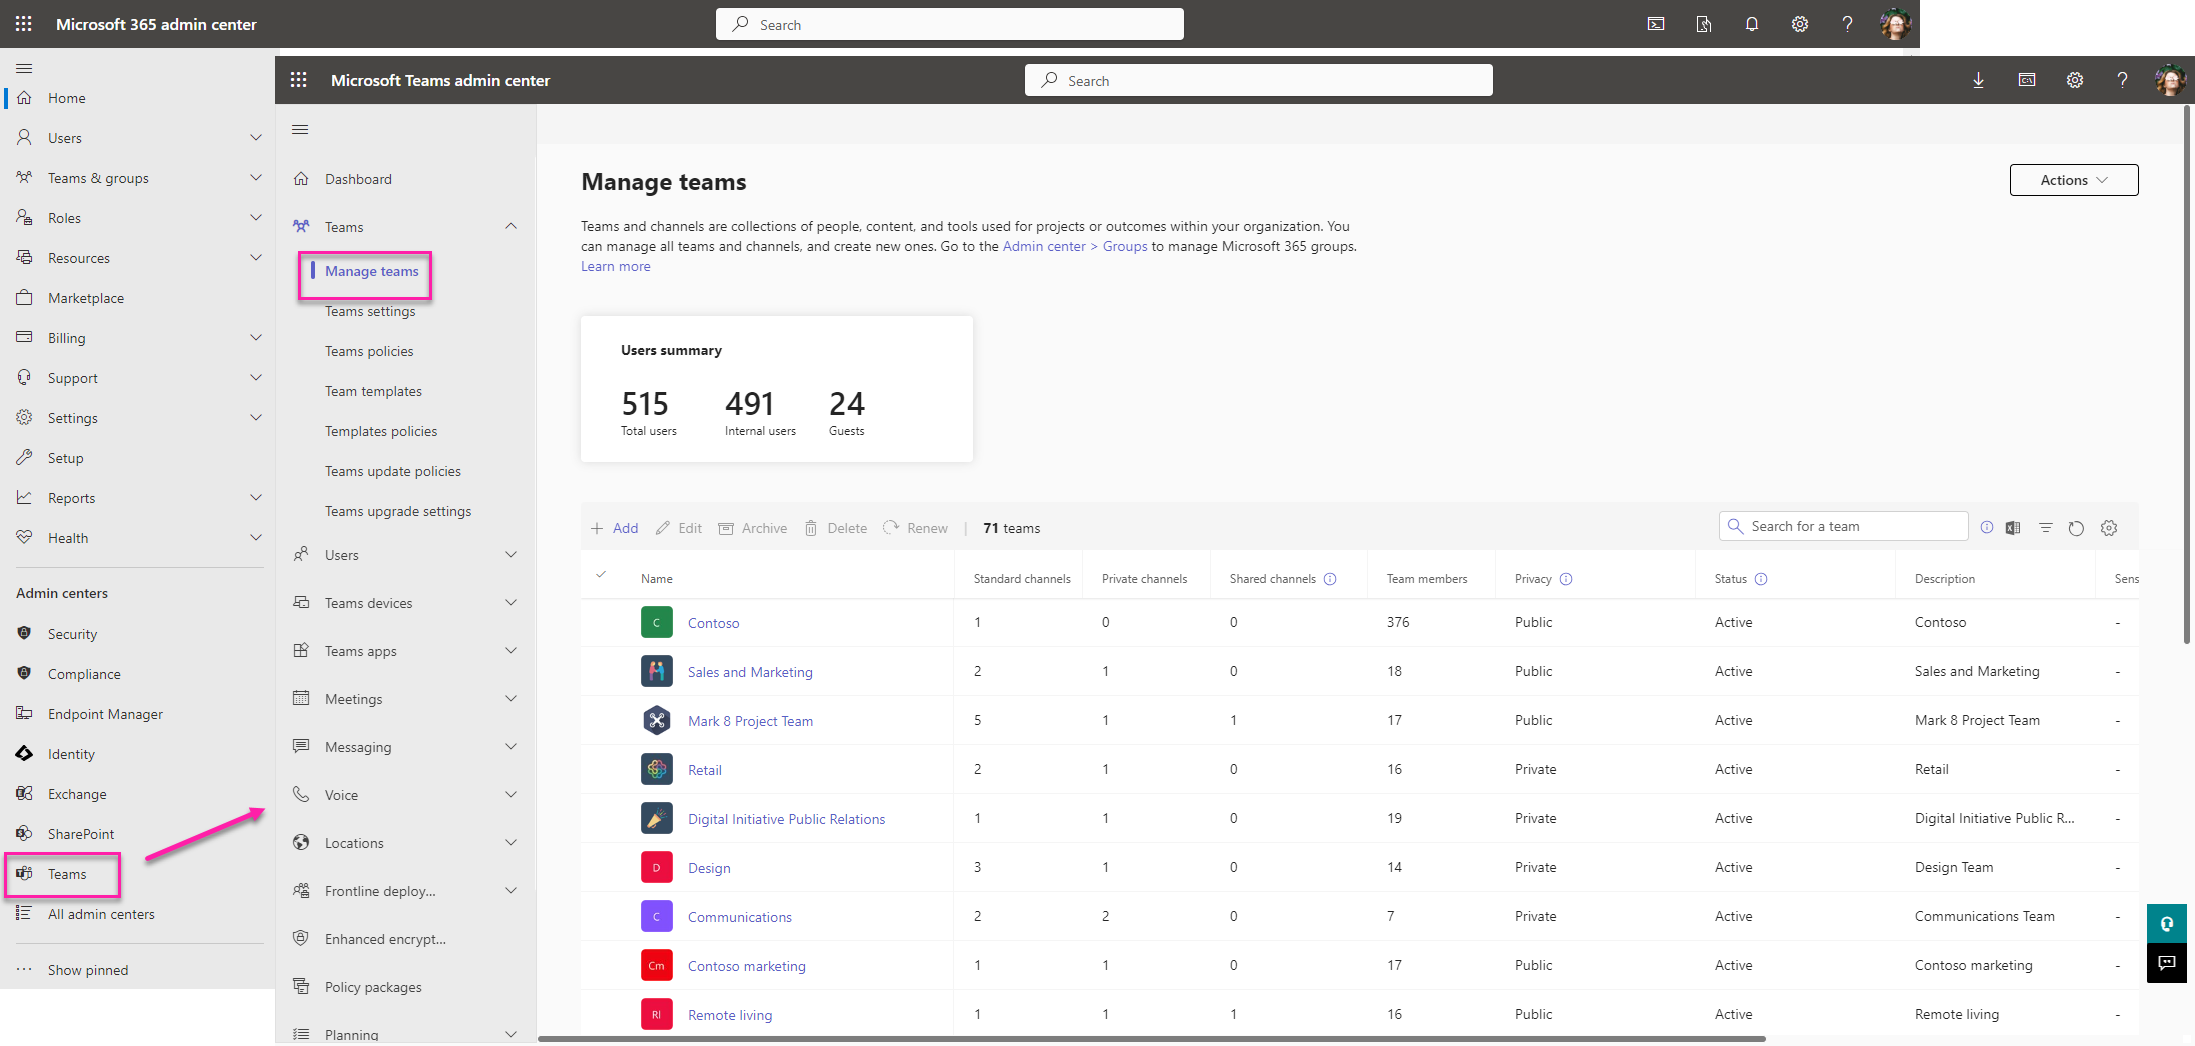
You’ll need to click on each Team to see a list of their channels. Unfortunately, there is no quick way to do this for several Teams in one shot, making it a tedious and time-consuming process.
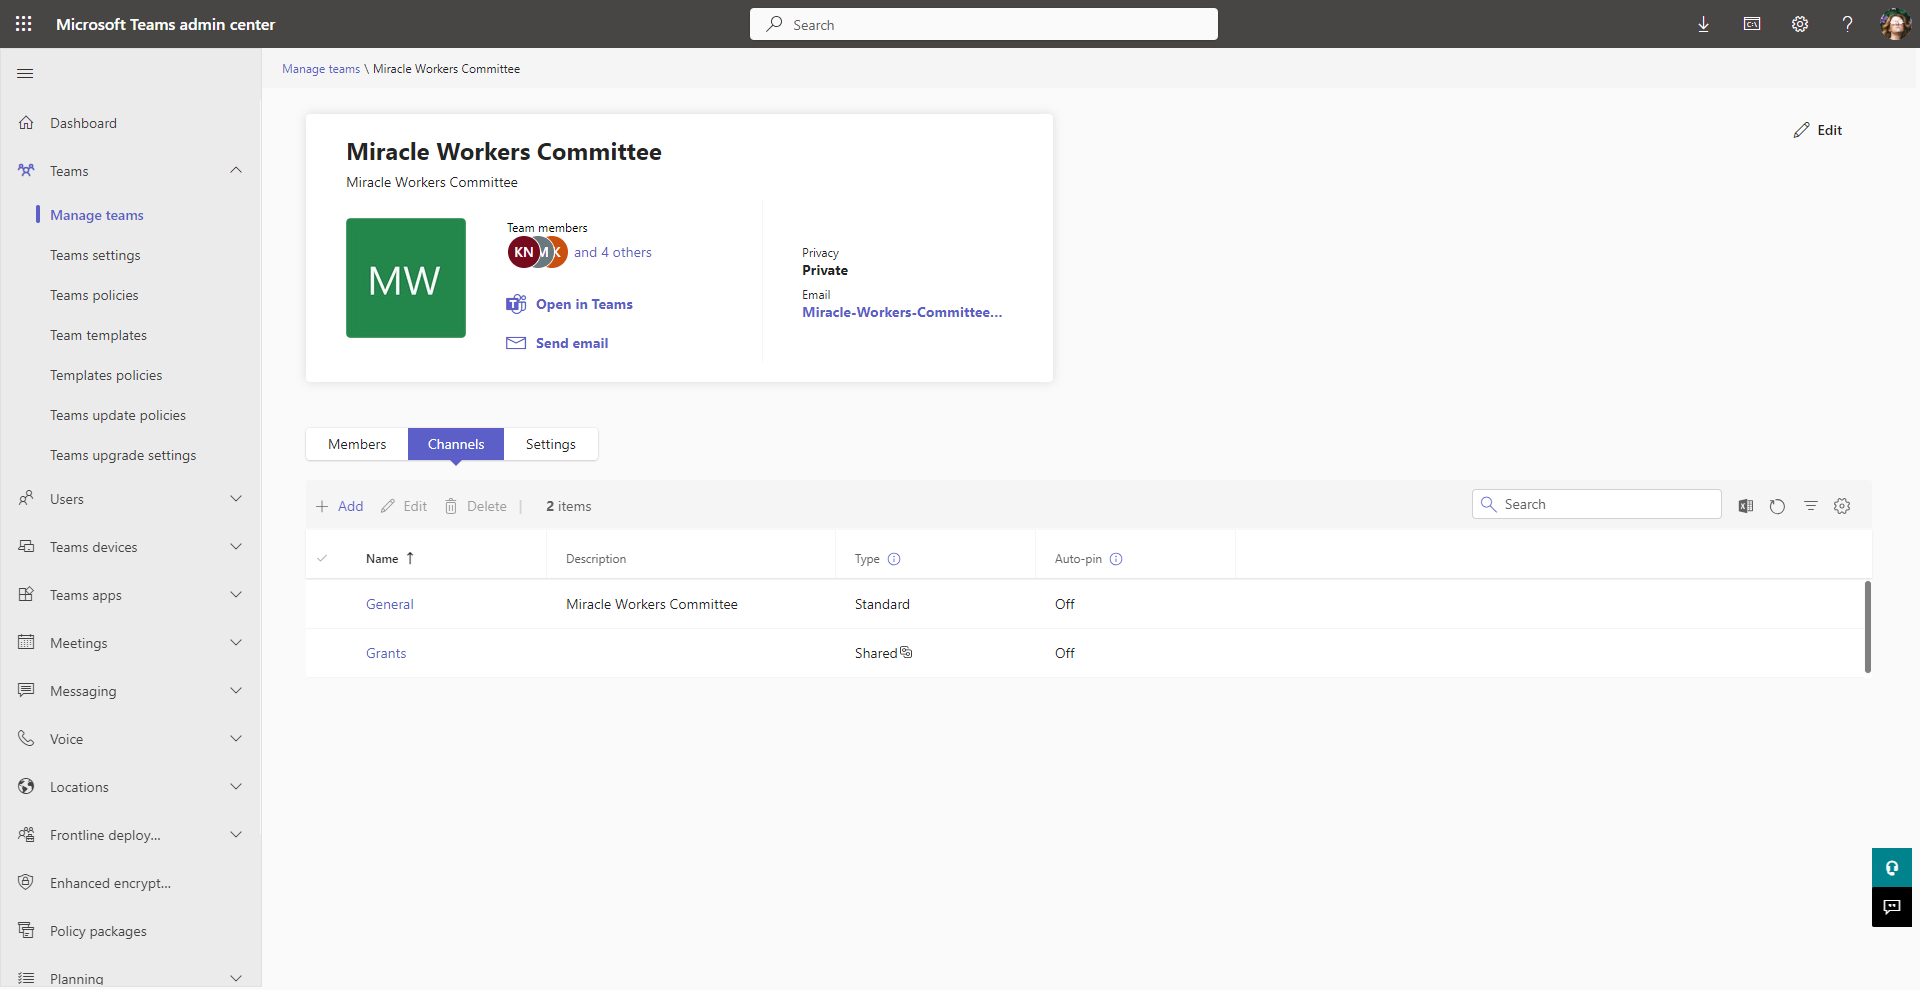
To see a list of members of the private or shared channels of that Team, you must click on each channel. Only then can you select the users you want to remove from the channel.
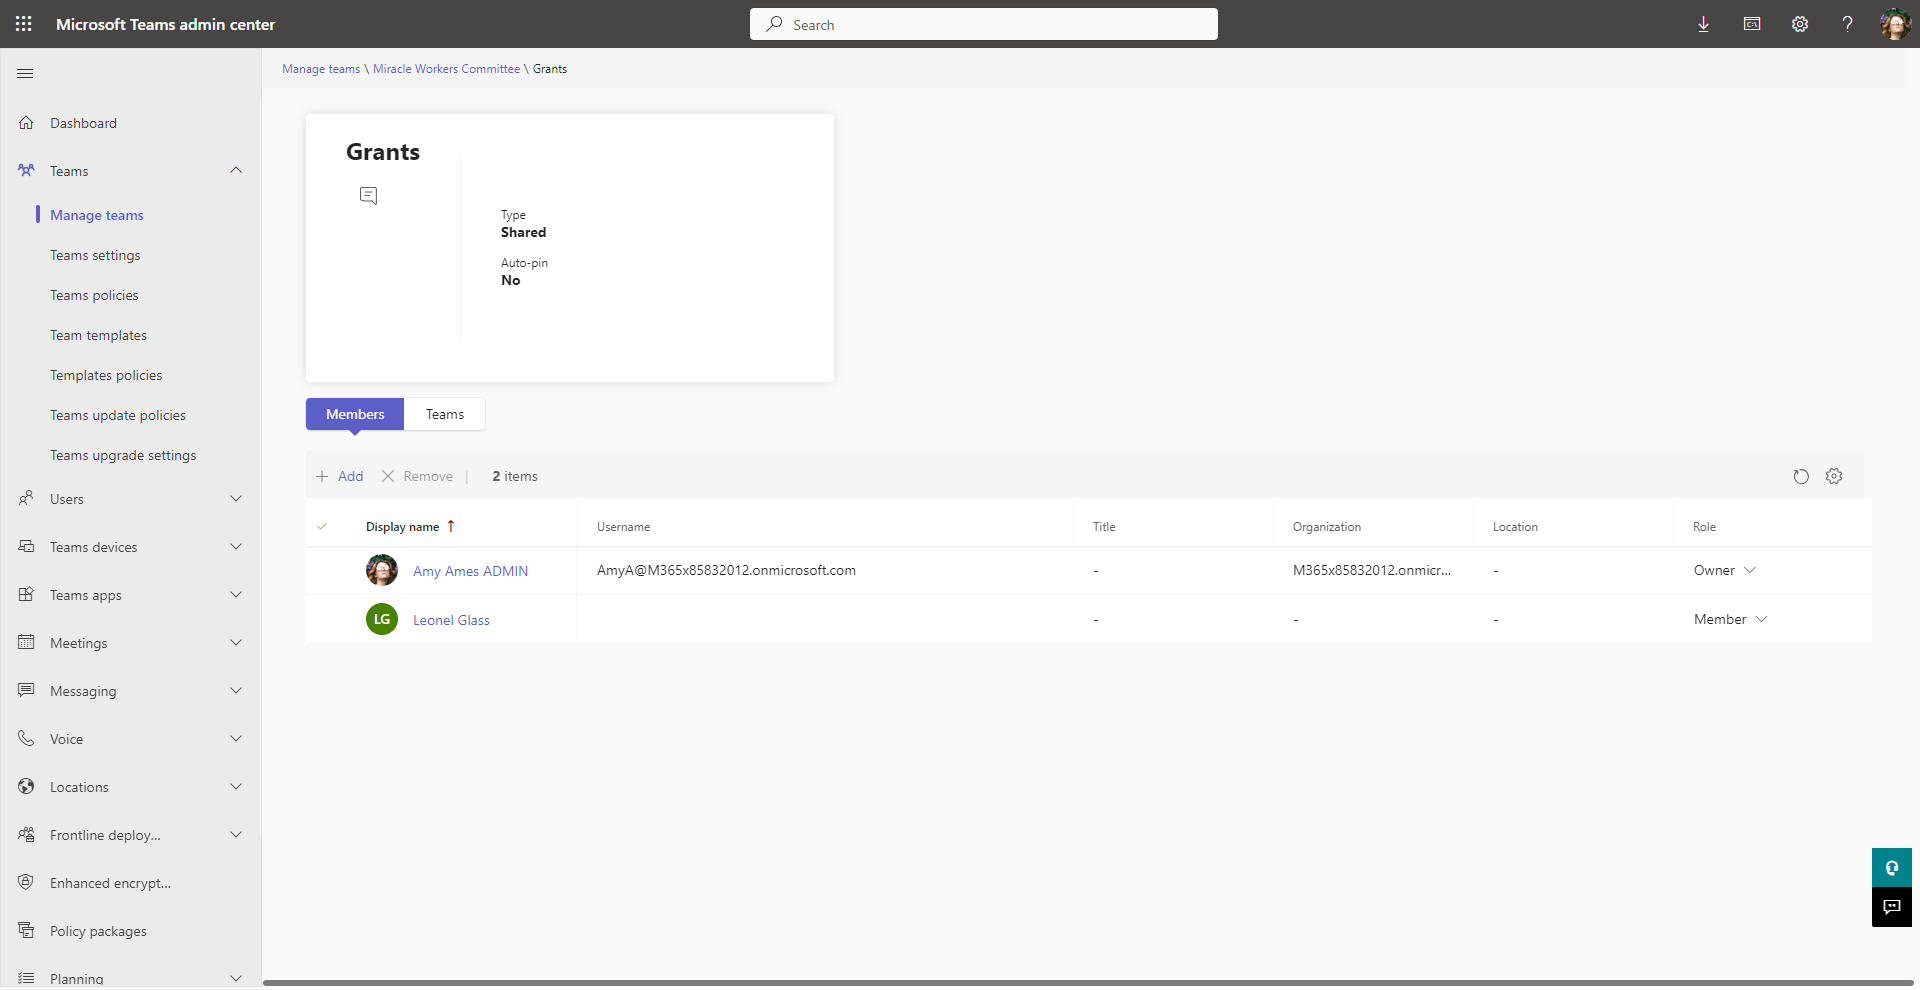
It should be noted that shared channels can have Teams as members. Our targeted users can be part of those Teams, even though they may not appear as members. This means that they are indirect members of the shared channel. So, it’s important to look at the Teams that the targeted Teams channel members belong to in order to make sure those Teams are not members of the shared channels.
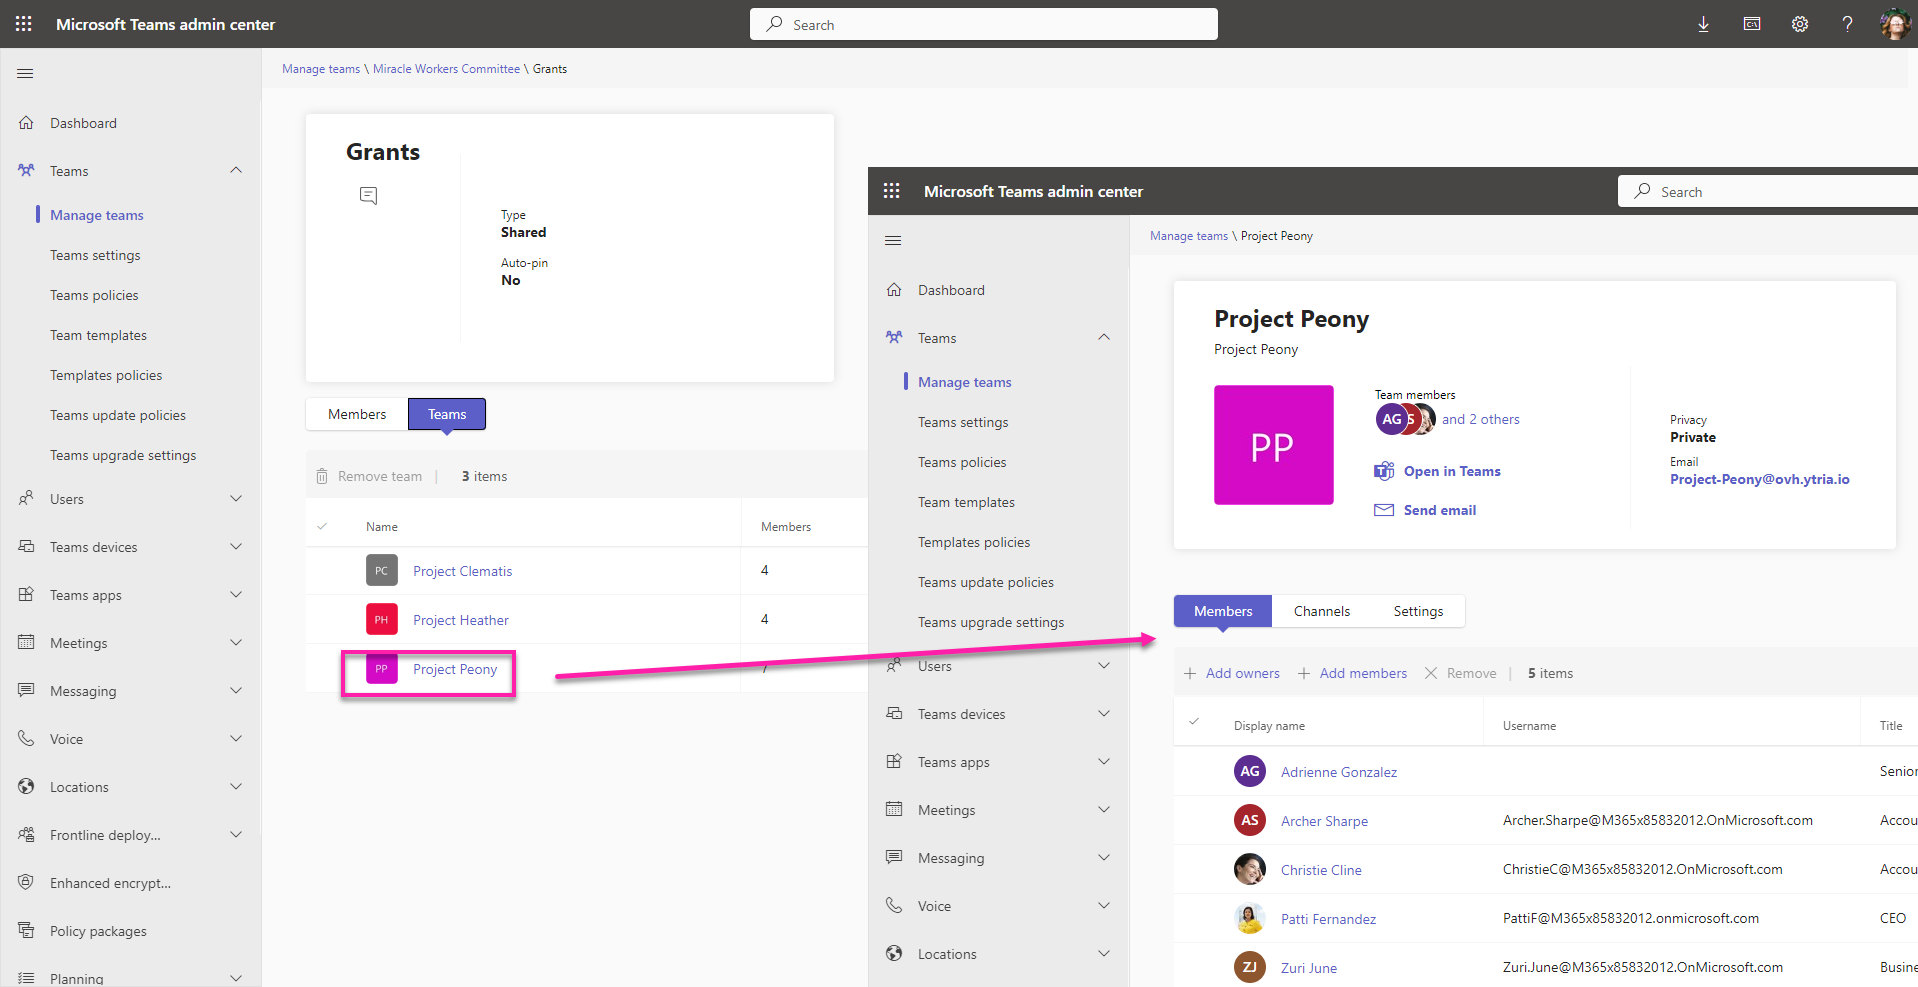
Clicking on the Teams tab will show you the Teams that are members of the channel. Even for just one target user, this can be an arduous process because you will need to do check their list of Teams against the list of members for each channel.
If you find these Teams that confer membership to the channel, you’ll want to take note to remove the users from those Teams.
Depending on the number of Teams you have, the number of channels, this process can be a long and tedious task.
Using PowerShell to remove Teams channel members
To accomplish this same task using PowerShell, your script will need to look up every Teams’ group ID, their private and shared channels, and then remove each user from each channel.
You’ll first need to connect to MicrosoftTeamsPowerShell module with Connect-MicrosoftTeams.
Then use the Get-TeamAllChannel cdmlet to get a list of channels.
You can then use the cmdlet Remove-TeamChannelUser to remove a channel member from each channel.
An example from this page shows the parameters needed to remove a user.
Creating this script is not easy, so it’s lucky that third party tools like sapio365 exist to let you do all this with just a click.
Removing Teams channel members using sapio365
sapio365 is a software tool that makes it easy to perform common IT tasks with just a few clicks and no PowerShell. It will provide you with an extensive view of all your users and data in one place, then allow you to group, sort, filter and organize the data however you want. You can drill down as deep as you need to find specific data and then you can make bulk changes safely because sapio365 gives you a preview of all your changes before you commit and save them.
In this example, sapio365 provides a global view of every group and Team in Microsoft 365 and all their properties. In one click, you can retrieve information about their channels. Then in the next click, you can get a list of every member for every shared and private channel. Then selecting and removing a user or even 100 users takes just one click.
Let’s look at an example where we want to remove 2 users.
Step-by-step removing a list of members from channels
1 – Start by getting the complete list of groups, where you can see properties like group type and if a group is Team.
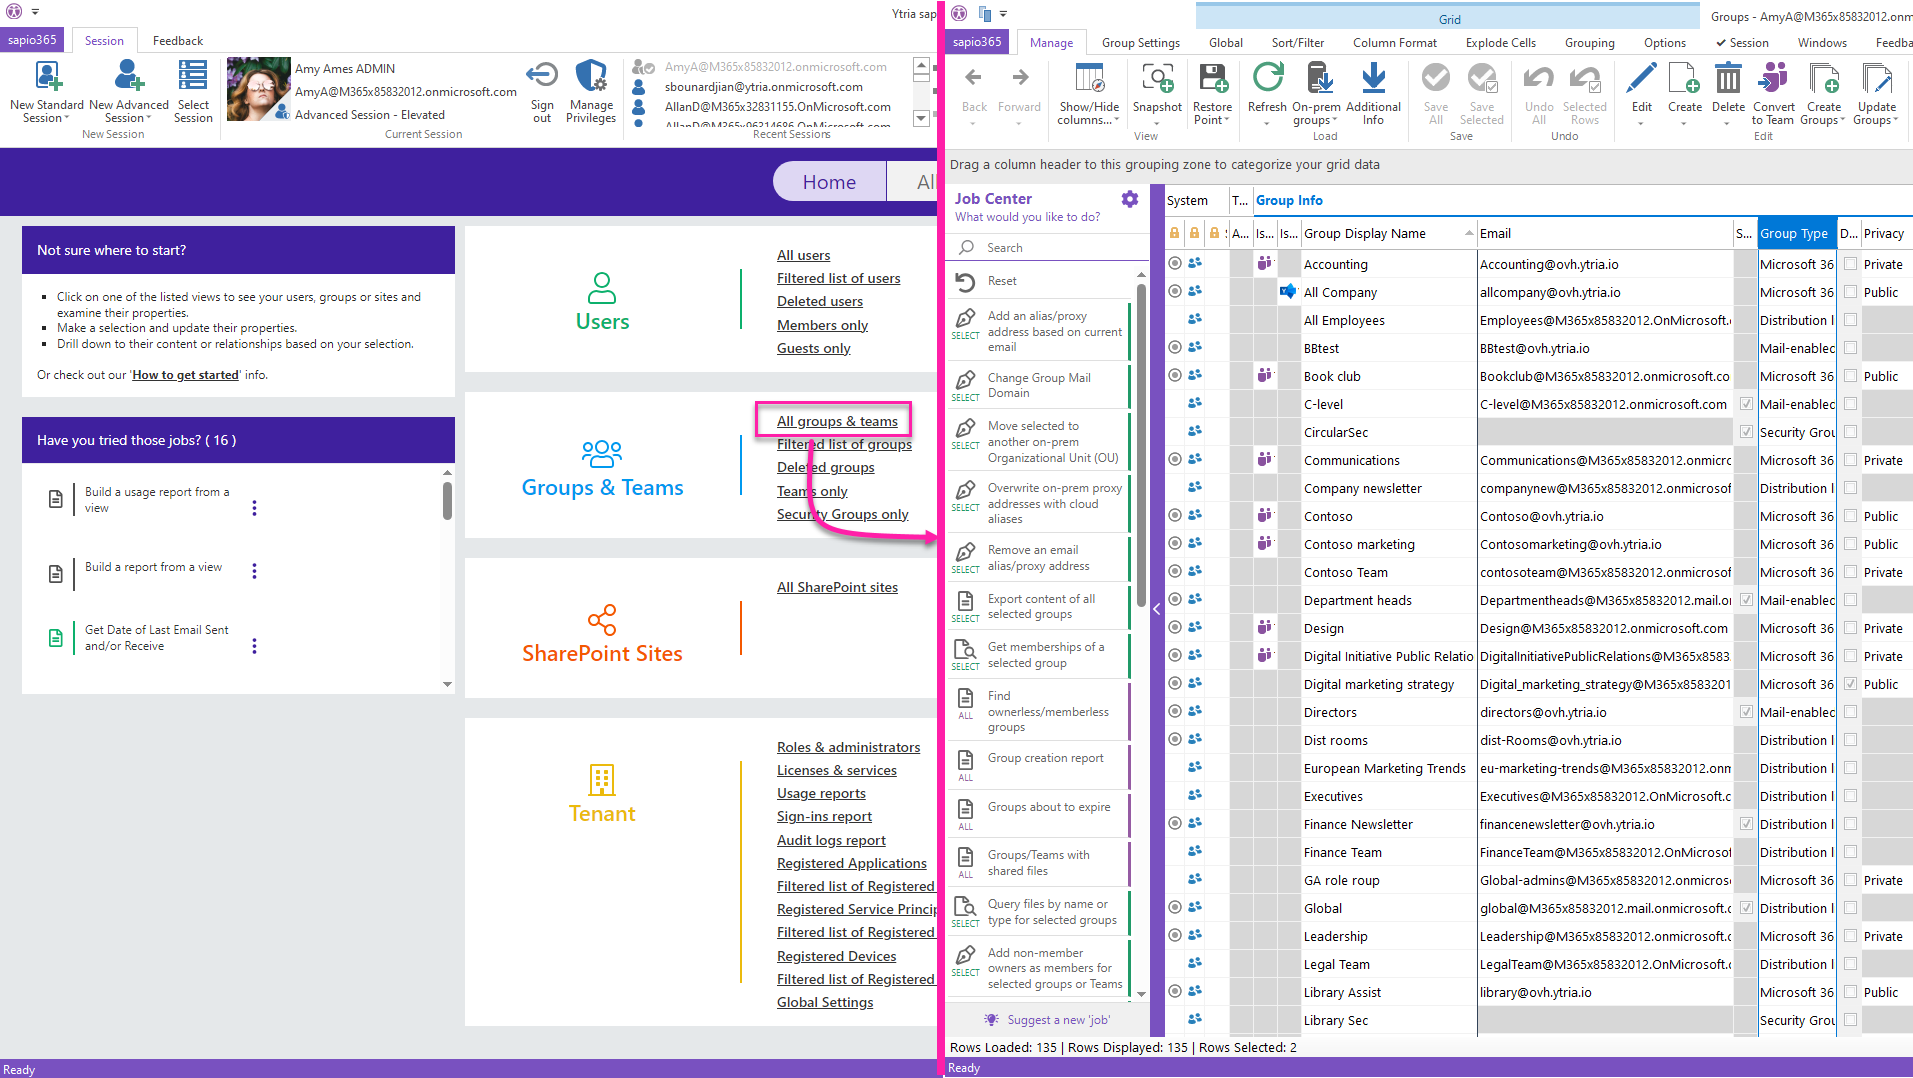
2 – We would usually start by first isolating the Teams with a filter in order to get a list of all their channels. But sapio365 is smart enough to only process the request for the Teams alone! So, select every group with CTRL A and click “Channels” to list them.
You will be asked if you want to include channels that were shared by other Teams, even external ones. Since we’ll be looking at every channel anyway, there is no need to select this option.
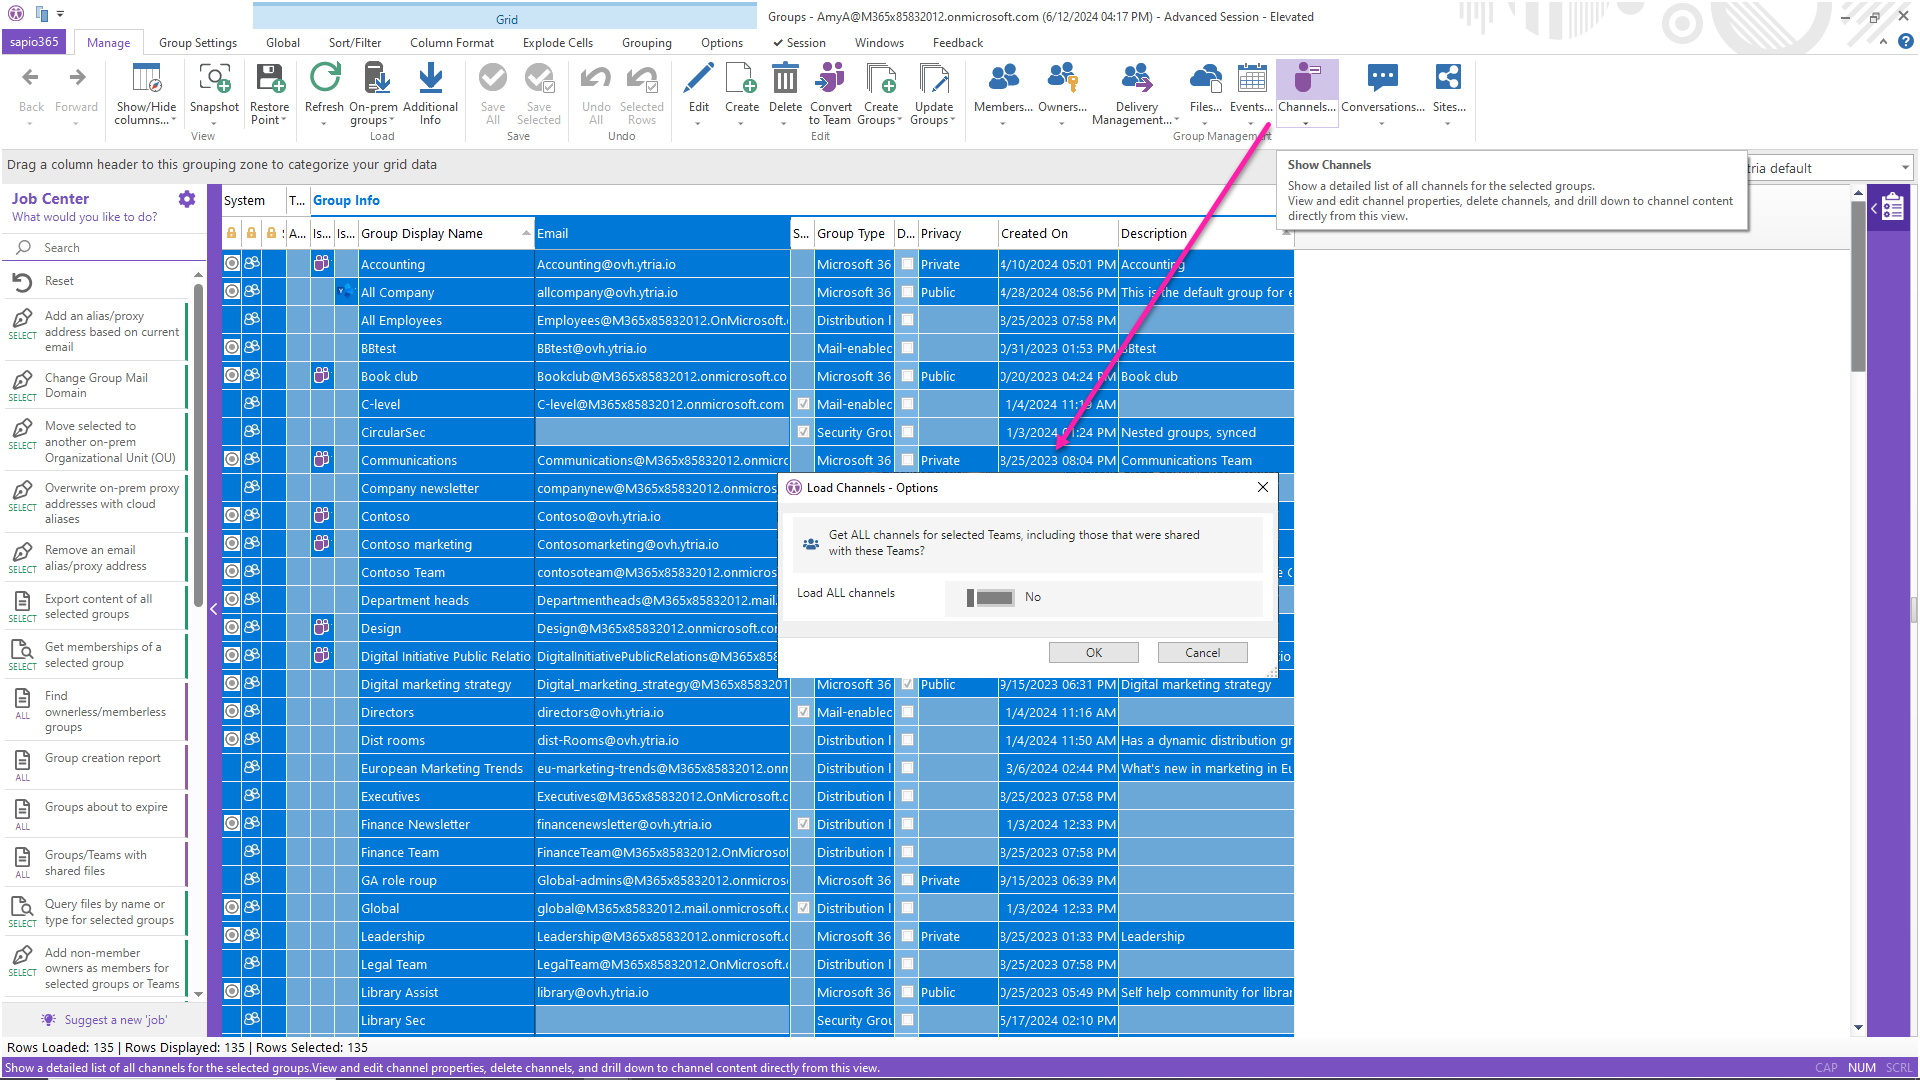
3 – Now you see every channel listed for each Team. You see the channel name, the type.
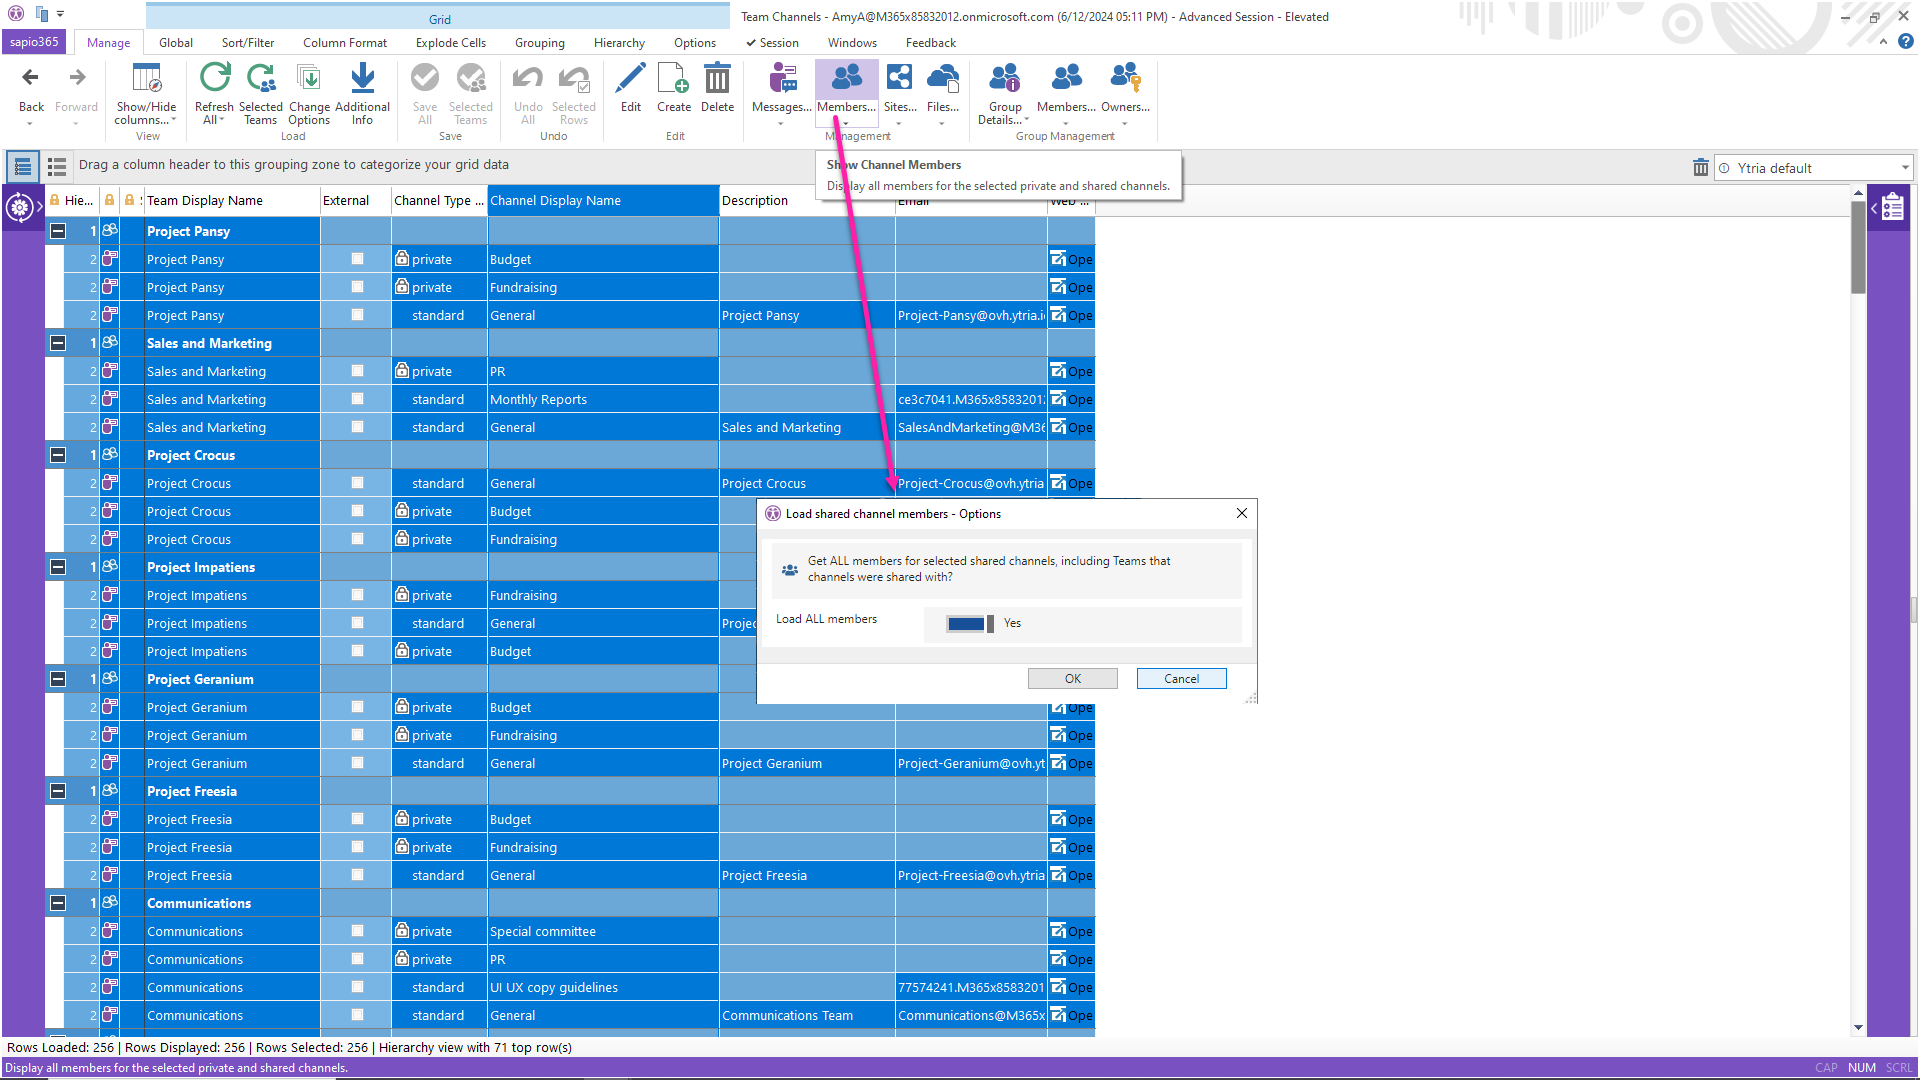
Since retrieving channel embers only applies to private and shared channels, we don’t need to use filters to isolate them. Select all the channels and click on Members in the Management section to load them.
Note that standard channels members are managed at the group members’ level.
You’ll be asked if you also want to include Teams that some shared channels were shared with. Select Yes because your target users may be part of those Teams.
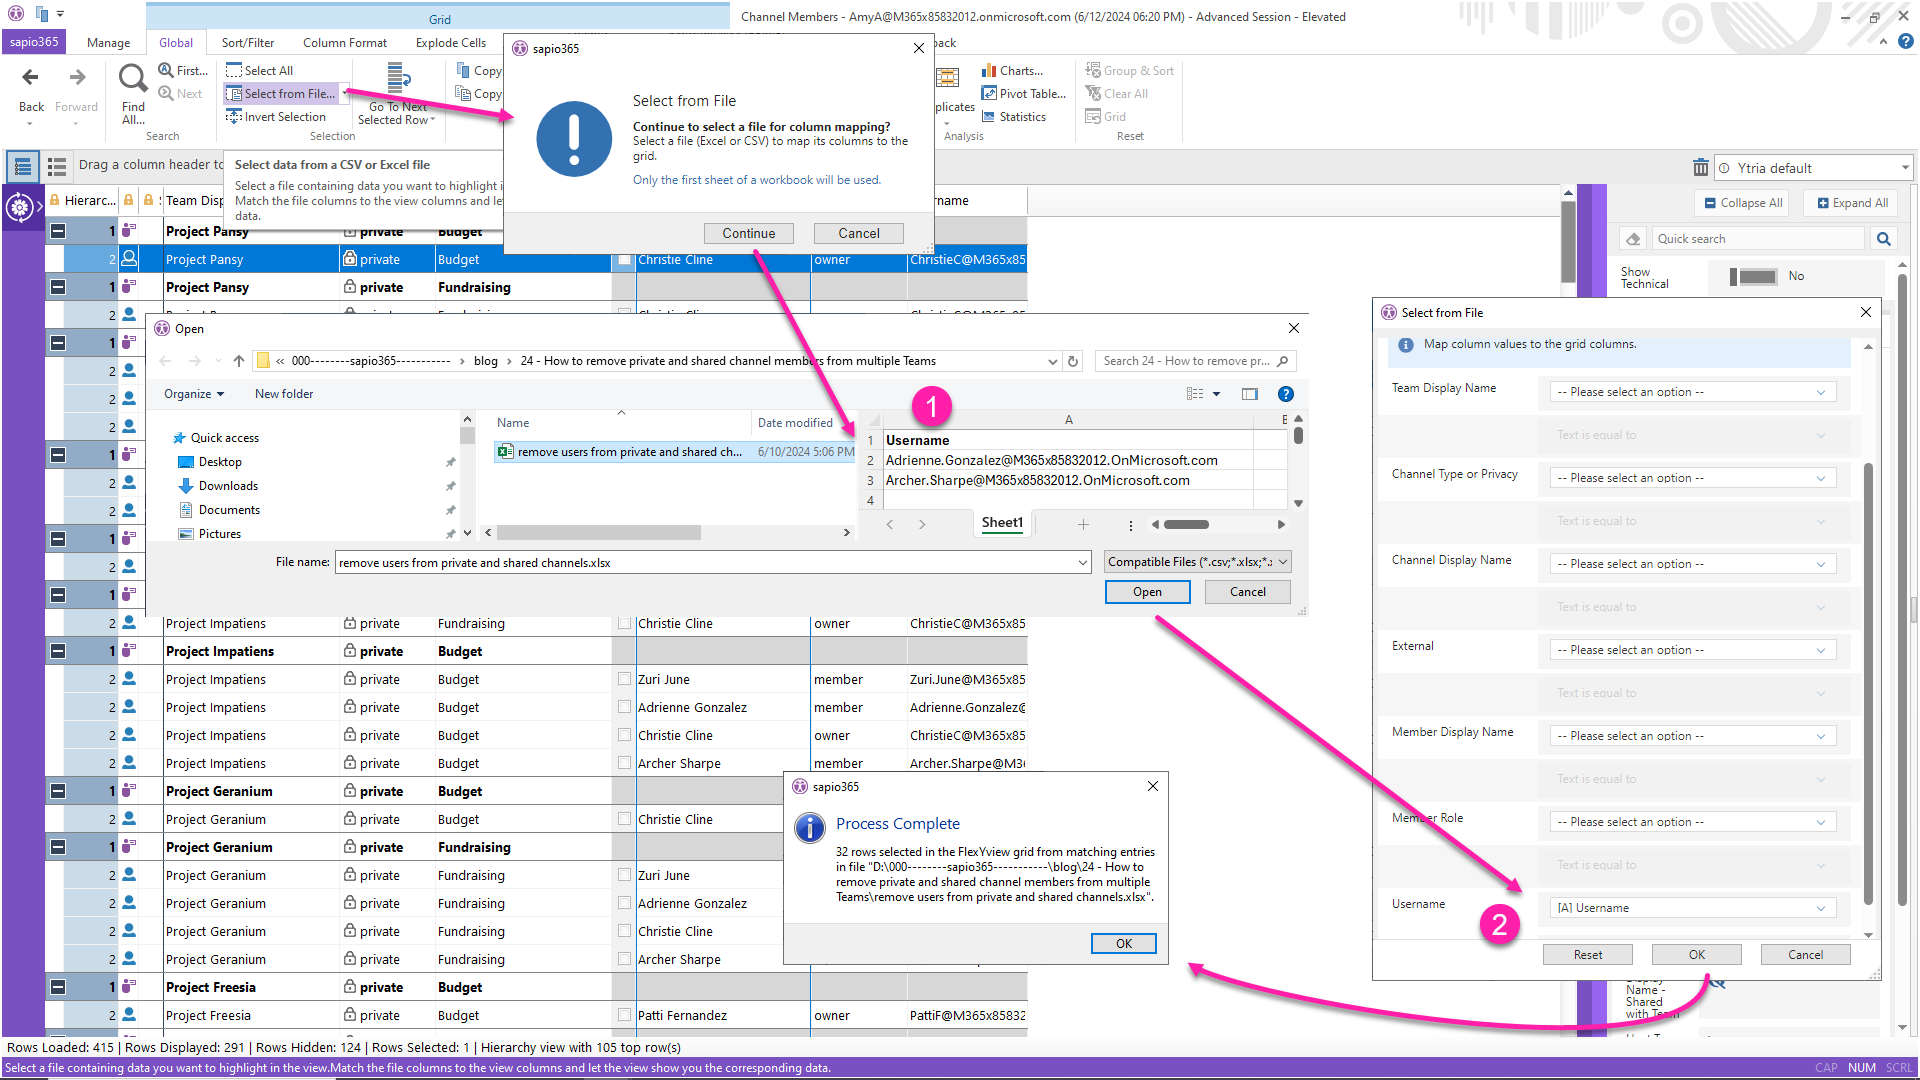
4 – Now that you have a complete list of members for every shared and private channel, you’re ready to remove the users from the channels. You can manually select the users to remove for each channel, but that would take too long. Use an Excel or CSV file instead. In this example, there are 2 users listed in an Excel file which you can use to select them in the view. You could have thousands of names there, and it would work the same way, and just as quickly.
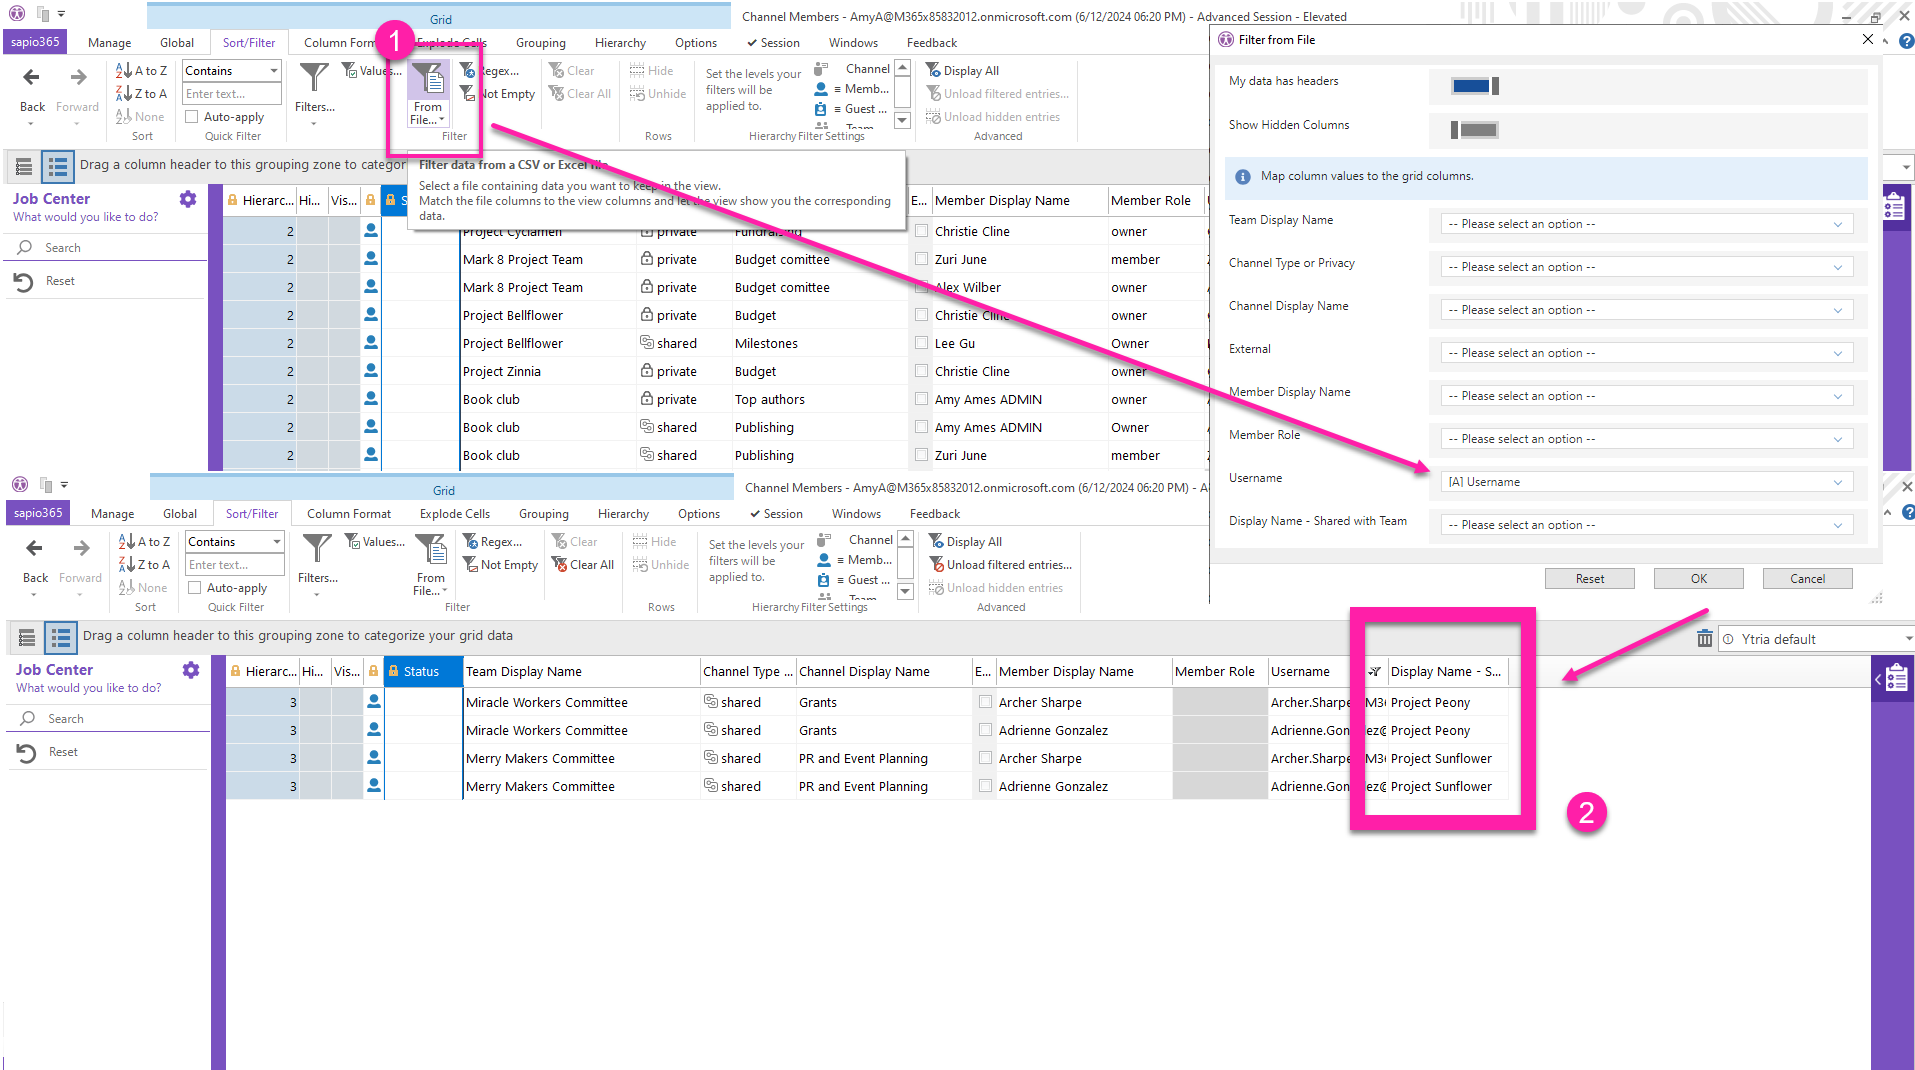
Since it’s a list of usernames, you can show that property in the grid first (1 in image below). Then click on ‘Select from file’ and map it to the corresponding column (2).
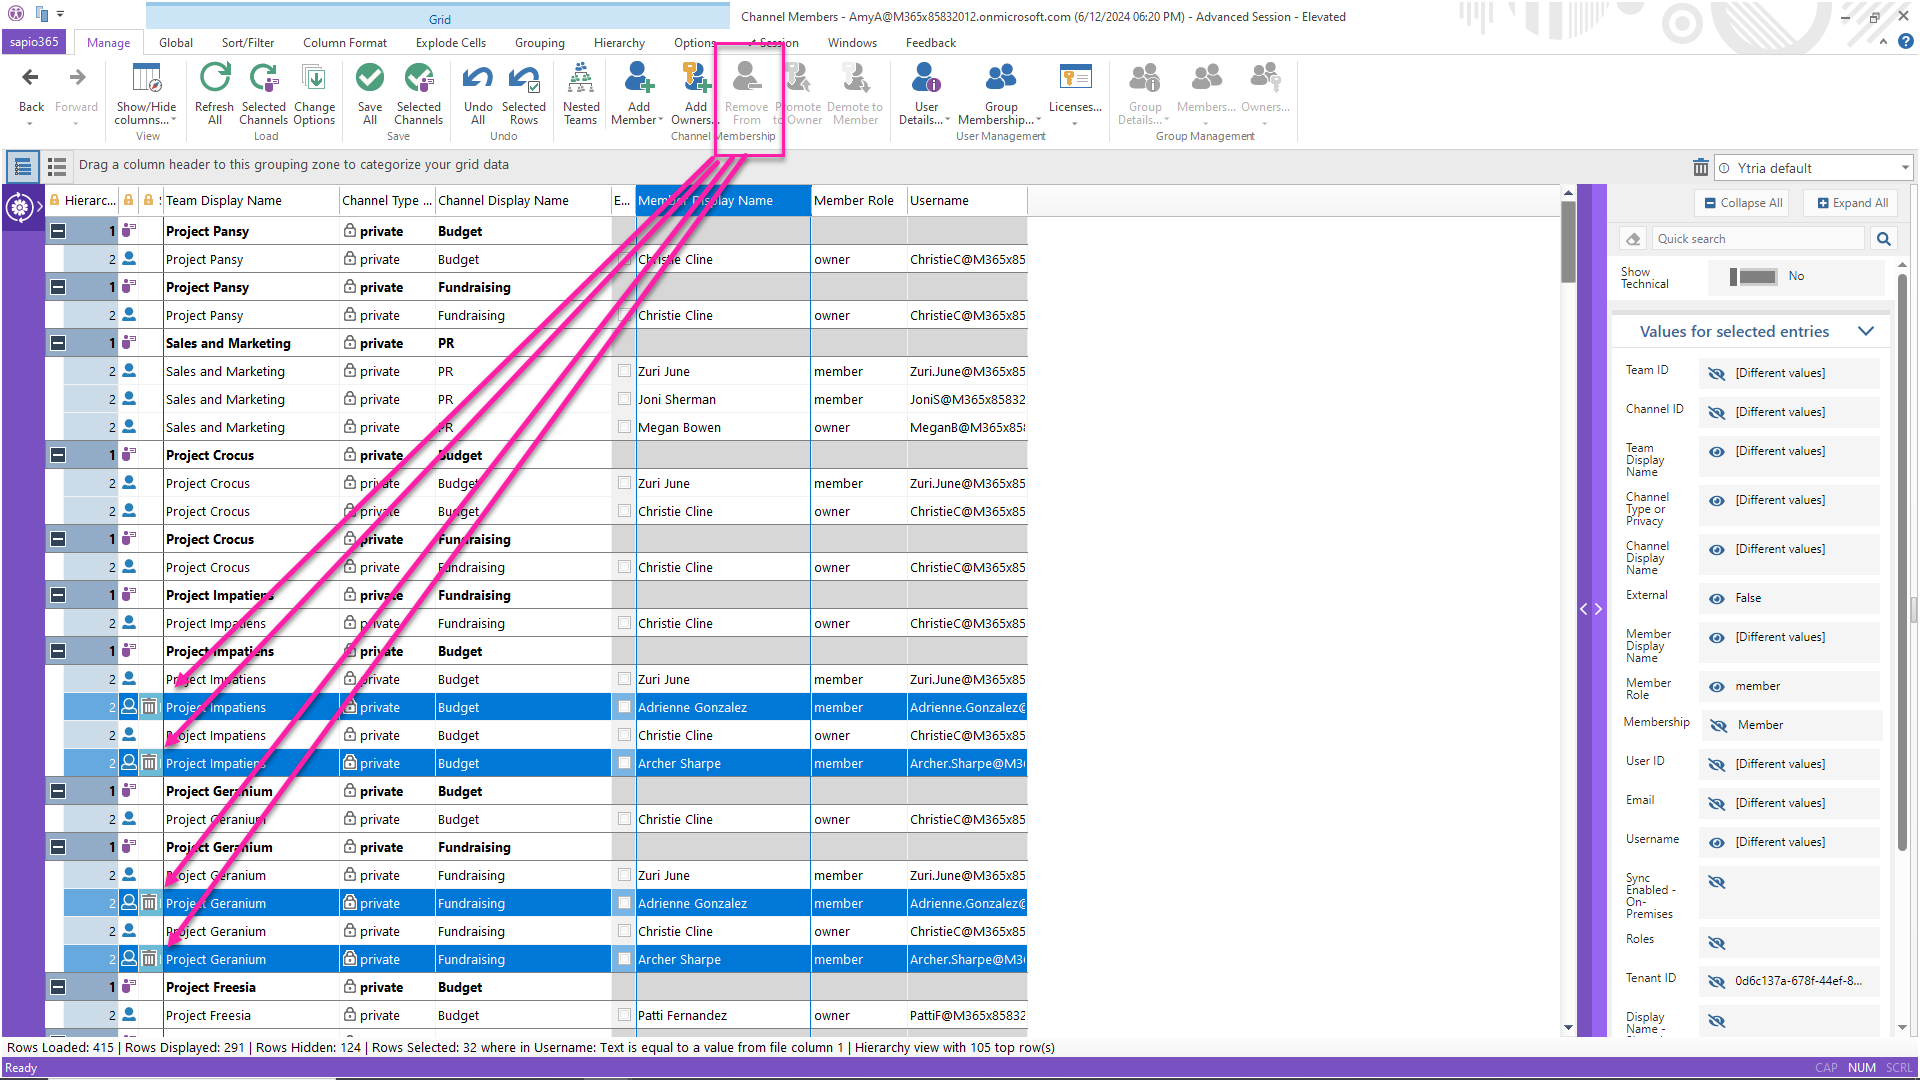
5 – Once selected, click on ‘Remove’ to apply a deletion state to those entries. You’ll see a trash can icon for each one. You can filter these in the next step to export a report before you actually remove them with the Save button.
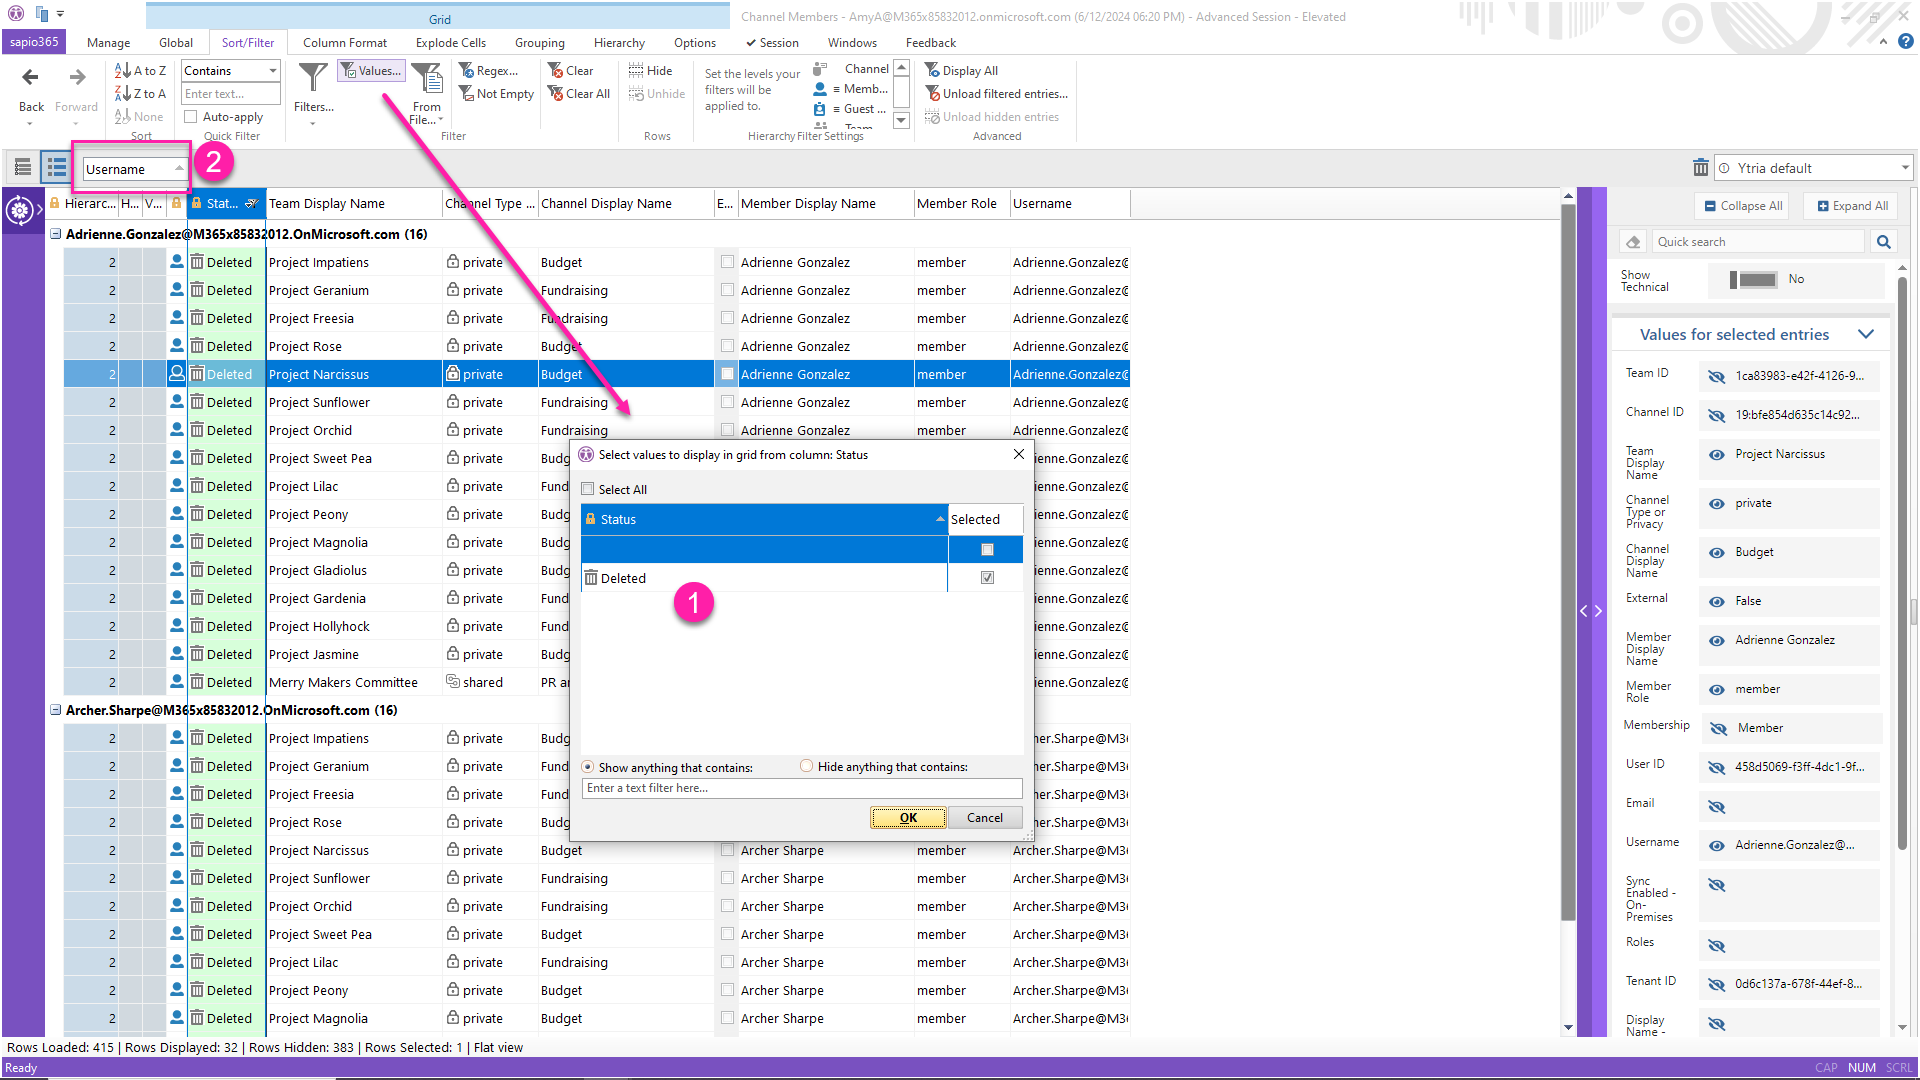
6 – If you want to export a report on these specific members, apply a value filter on the status column (1 in image below), and group by user (2) by dragging the header to the top left of the grid before hitting the Export button. This also allows you to review the staged changes before committing to them.
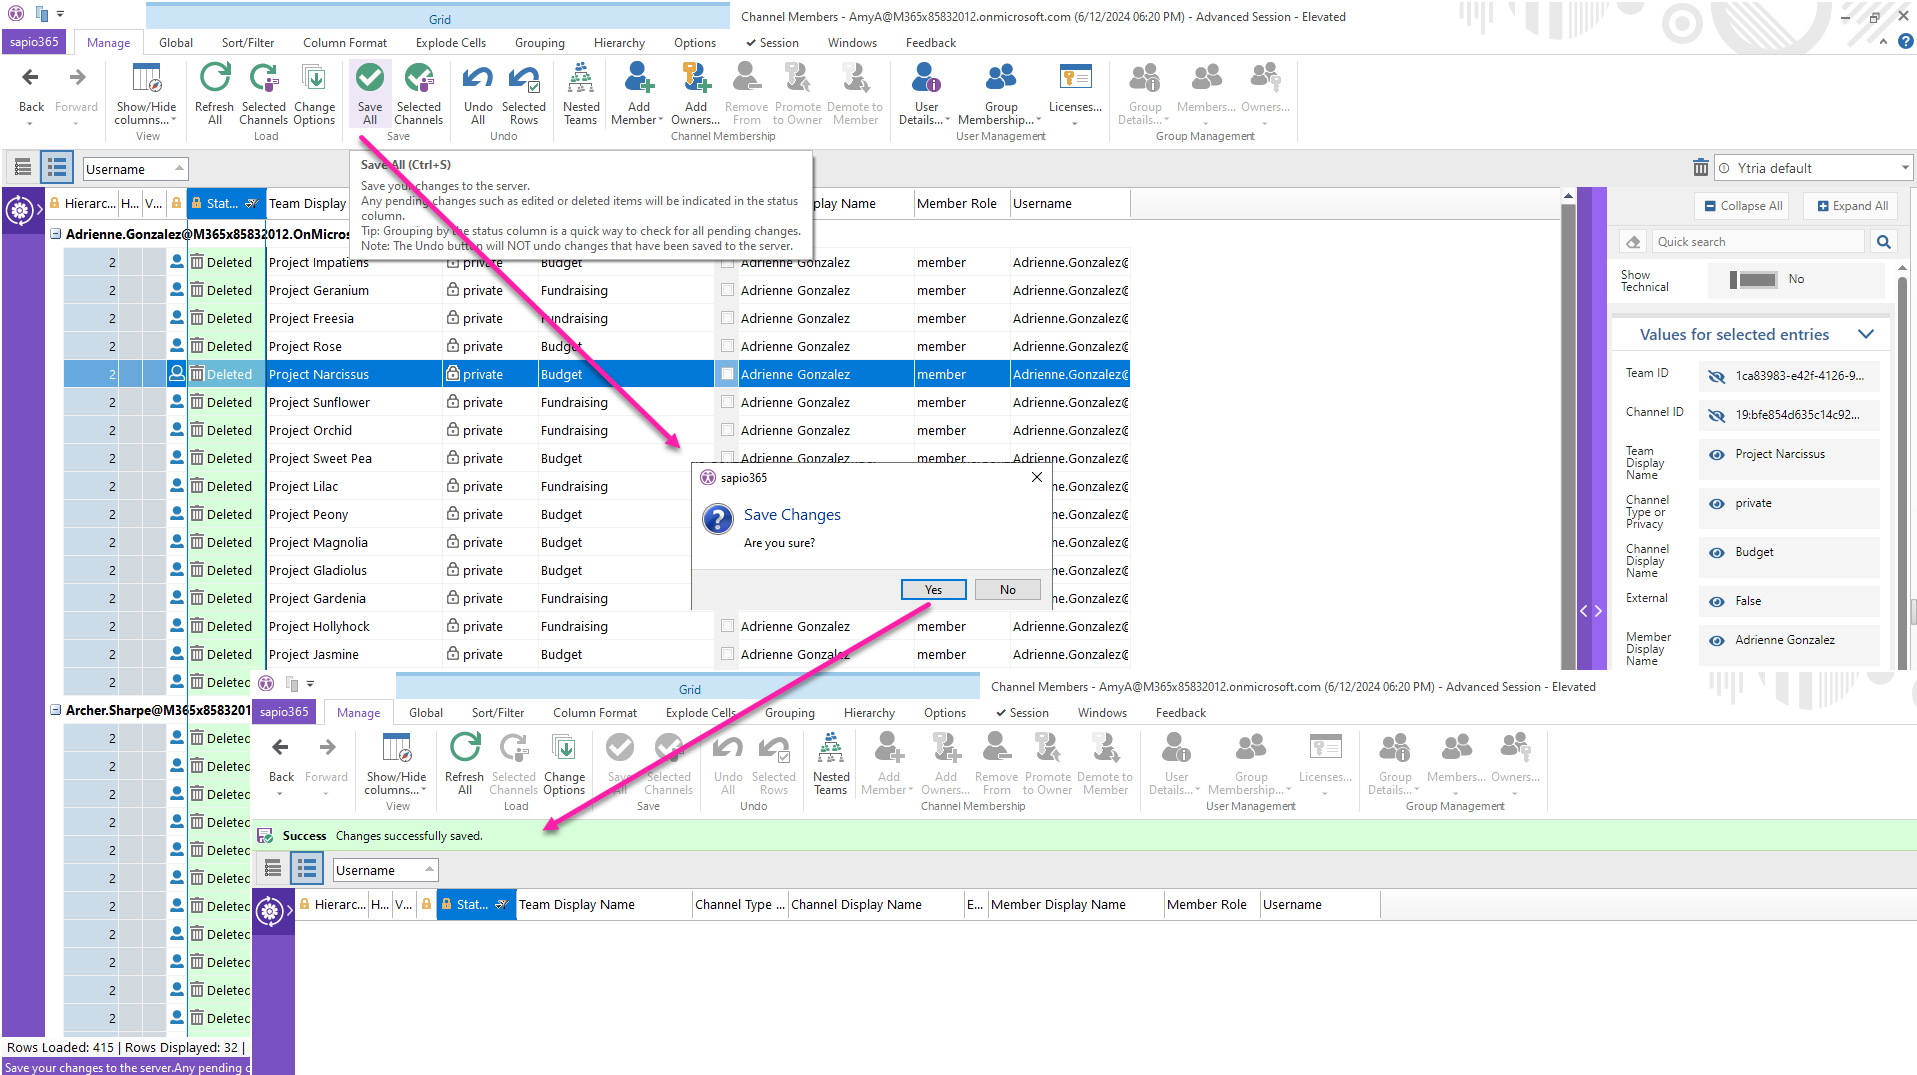
7 – Click Save to commit the changes. The entries will be removed from the grid, and a success message will be displayed in a green banner. Good job!
Checking users’ access to shared channels through their Teams
You can also check if any of the users on your list belong to any Teams with which channels have been shared.
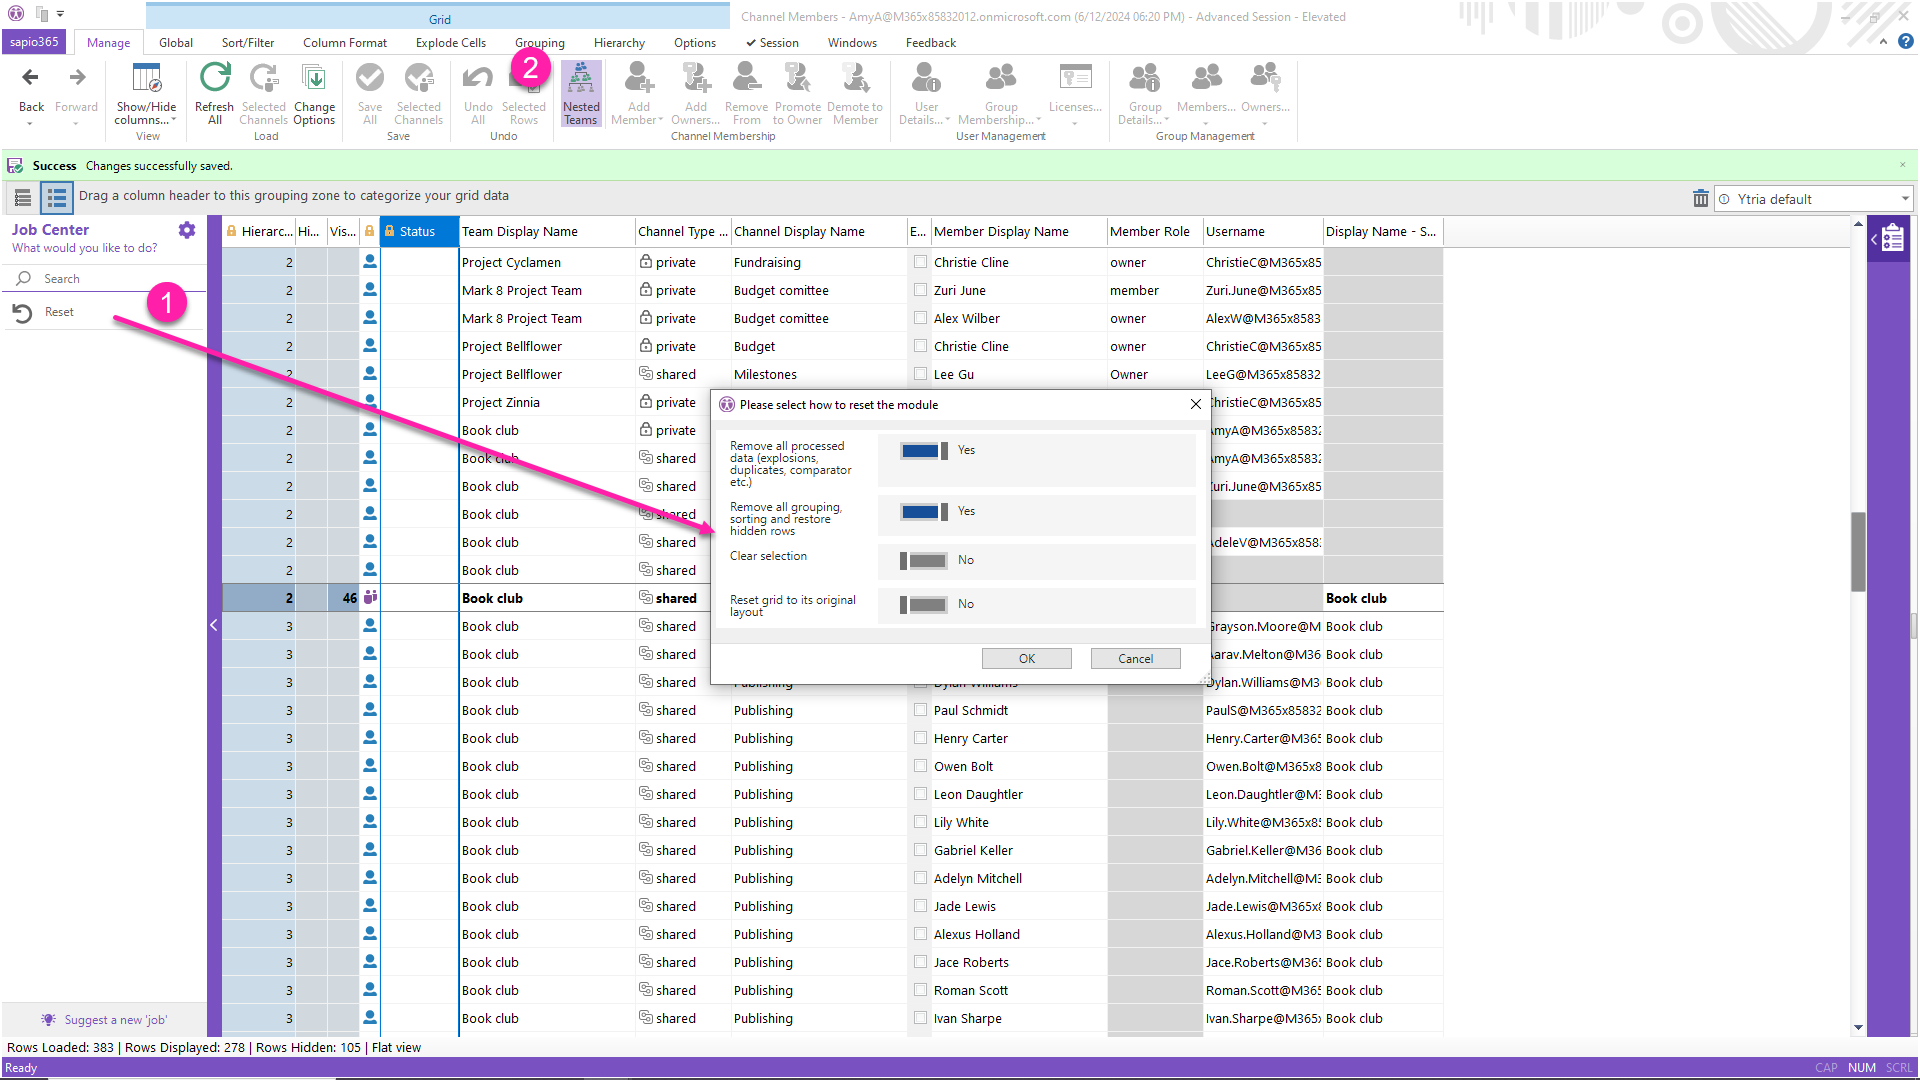
First reset the grid to remove all filters using the ‘Reset’ job on the left (1 in image below). Then load nested Teams (2).
Next, you can use your file again to select the users. But instead, let’s use it to filter them (1 in image below).
What you get is a list of Teams the targeted Teams channel members belong to that have access to those channels (2) through direct membership of those Teams. For example, Archer and Adrienne both have access to the ‘Grants’ shared channel of Team ‘Miracle Workers Committee’ because it was shared with the Team ‘Project Peony’ of which they are members of.
To remove the users’ access to the channels, you would need to remove their whole Team (removing access for every member there as well) from the channels or remove the users from the Teams that have access to those channels.
Conclusion
As with most IT admin tasks, there are always several ways to accomplish a task – everyone has their preference when it comes to how they work, however, with sapio365 the time and effort saved makes the choice easy. Using sapio365 to remove private and shared Teams channel members from multiple Teams takes much less time, is safer and easier. The ability to preview changes before saving them prevents unnecessary errors from occurring.
You can learn more about managing Teams members here, or check out all our blogs. You’ll discover the many ways sapio365 can help you save time.


Submit a comment